Nissan 180SX Gravel Rally Car- Strip out
When building any dedicated competition car, preparation is the key. Even for cars used for club events like Khanacross, Autocross and tarmac events, a lot can be gained for very little cost. Weight = performance. Just by removing various un-necessary items, a huge amount of weight can be saved. Straight away even without any engine mods, the power to weight ratio is improved.
To build a competitive gravel Rally Car, a lot of preparation time is spent removing items before new parts are fitted. With the 180SX in the workshop the fun began. First on the list was a full strip of the interior. All the seats, carpets, centre console, roof lining and plastic trims all ended up out of the car. Worthwhile items such as the roof lining and front Skyline seats were carefully removed for future re-sale. Same went for the Sony car stereo and turbo timer. Any recyclable items such as steel brackets etc went into the scrap metal bin.
The factory dash, front door linings, sill kick panels and heater controls were all kept. Some of these items are required by CAMS rally rules and must be retained in the car.
We got the scales out to work out how heavy some of the items were we’d removed. For example, a quick weigh of the two 6×9 speakers that were cut into the rear hatch cover showed a little over 4kg on the scales! The bottom back seat cushion didn’t weigh much, however the stronger folding section of the rear seat was quite heavy.Whilst stripping the car, we removed the front mount intercooler (FMIC) and all of the associated pipes. Some would be asking themselves why we did that. We know for these type of cars it is a usual mod to fit a front mount. Simply put, the rally regulations do not allow it. You have to run the factory intercooler or one of a similar size and in the factory mounting location. If the car wasn’t fitted with an intercooler (ala some of the early Mitsubishi Starions and Nissan Exas), you’re not allowed to fit one for gravel rally. I’ll cover more on the list of allowed parts on another post further into the build.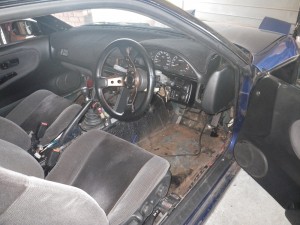 In the case of the 180SX, the giant FMIC weighed in about 15kg and that didn’t include all of the stainless pipe work, extra hoses and clamps. It shows that it doesn’t take much for the weight to add up. Between the rear speakers and the FMIC, we’d “Jenny Craig’d” 20kg of weight out of the car.
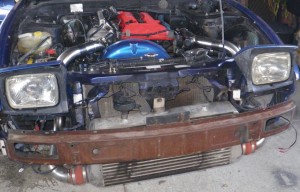
Once the trims were all out, we then set about removing a lot of bodgey wiring. The Alarm and turbo timer were not well installed and wiring to an array of gauges was an electrical fire waiting to happen too. The electrics were all tidied and repaired. We also discovered that some crucial vacuum/boost lines had more tee’s than garden reticulation. To this day I am still amazed of how some people have no idea about what ranks as critical with engine management. As we progress further into the build we’ll rectify the boost lines and sort out the list of plumbing problems.
While stripping the car, the complete rear cradle and tail shaft was dropped out of the car. On some cars it is a real sod to get the rear sub frame assembly out. Thankfully the S13 is a pretty straight forward job. Whilst dropping out the rear cradle, the hand brake assembly and cables were also removed. Brakes detail will be covered in a future post.
The next job is the most tedious and often dirty job of the whole build. Stripping the body deadening and seam welding. To give a rally car shell longevity and improve rigidity, the shell is seam welded. In a nut shell, this means stitch welding the whole shell inside and out around crucial seams. In the ideal situation, a car is completely stripped of everything, acid dipped to remove all sealant and tar and then mounted on a rotisserie. This of course comes at a cost and like many competitors, there is only so much budget and time available. With a strict budget and the start of the 2013 season not that far away, mechanical stripping was the only avenue for this build.
On the 180SX, the underside of the car is treated with a thin coat of tar paint. It was relatively easy to remove the coating around the rails and suspension 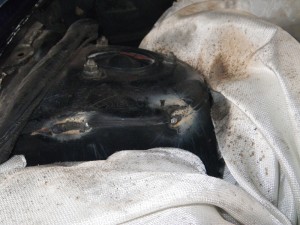 pick up points where required. The seam welding then began. After spending many hours under Rally Cars on a hoist seam welding in the past, I have come to the conclusion that axle stands and a creeper are a much easier way to perform the work.
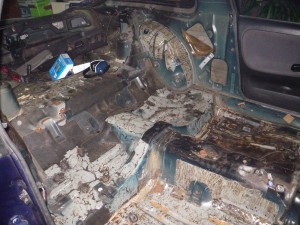 Inside the car the sound deadening tar removal began. Most manufacturers use tar as a cheap way to reduce NVH without adding a large amount of carpet underlay or foam. We are weighing the tar as it is stripped from the car, so far around 10kg has been removed with just under half the car to go. As the tar is removed from each section of the car, the seam welding inside continues.
We count ourselves lucky with the 180SX as far as the tar goes. On a previous Commodore rally car build, we stripped a good 60-70kg of tar from the shell! Even MKII Escorts have around 30kg stuck to the floor.
Next post we’ll be tackling the rear sub frame and mechanicals.
More build articles here
