Nissan 180SX Rally Car- Interior works part 1
“Nissan Sikaflex” was the remark from our mate Bryan when I was describing how much sealant I’d removed from the 180SX whilst preparing for the seam welding. Bryan’s remark wasn’t far from the truth! The defeatist thing about seam welding is that you remove all the sealant, stitch weld the seams then put a bead of sealant back in again. That was exactly where we were, once we had removed the cage from the car.
More than a tube of sikalflex has gone into the 180SX in the last few days. “Why would you need to put sealant into a rally car?” you ponder as you’re reading this. Good question. In some rally cars there is little need to seal seams as the factory tolerances on panels are tight. In the 180SX, some pressings have a 5-10mm gap at the seams, particularly around the wheel arch and side panels to the floor pan. When you seam weld, you only put a 20-30mm stitch weld every 100-150mm, not continuous welds. Whilst seam welding is designed to stiffen the shell, it does need some movement to prevent cracking. The new sealant fills the voids and maintains flexibility. Whilst we were at it, all internal welds, small holes, drain plugs and some external welds also had a bead of Sikaflex put over them as well. This allows for filling of any tiny pin holes in the welds and makes sure the drain plugs do not come out. Having gone through muddy puddles in an old Khanacross car where the floor bungs came out (it looked like someone had power chucked mud through the car), we don’t want the same fate in any rally cars. A tip here is not to use race or foil tape to cover up holes in the floor pan. The speed of mud/water and flying gravel on a rally easily rips tape and opens holes. Use the factory plugs with good sealant or if you lose or damage the factory plugs, glue or weld washers in place over the holes.
With the heat we’ve had in the last week, the workshop has been pretty hot and everything including the 180SX has absorbed the heat. Whilst using the Sikaflex we noticed that it was beginning to flash off within a couple of minutes of application. We realised this when we went to smooth off a few of the beads. Normally there is 3o or so minutes of working time with Sikaflex before it starts to set.
Whilst the Sikaflex was curing, the cage was re-assembled out of the car and prepared for painting. We also cut out some light weight aluminium panels (where the rear trims were removed under the rear windows) and riveted in place. We also used adhesive foil tape to cover any larger, non structural holes holes such as the factory pressing holes in the inner sills and rear seat belt threads (which already had a blob of Sikaflex in them).
The plan had been to spray the cage. This plan quickly changed when late one afternoon the air line fitting broke off inside the spray gun before

we’d even started. With time running getting short and the threat of rain, out came the paint brushes. Paint brush finish is not as smooth as spray painting, however it does have its advantages. The biggest is touch ups are easy to match in, as invariably a bolt in cage will get a few scratches when it is installed in a car. Spray painting a cage can often be a tricky business too. We’ve seen plenty of cages with runs on the underside of bars or places where the painter has missed and you can see bare metal.
One of the big questions was what colour to paint the cage and interior. There are many trains of thought and it often comes down to how far stripped the car is as well as time and budget. In the past we have used both black and white as neutral colours or matched an external colour. Both black and white look brilliant when the paint is fresh, however black is very hot and both colours look terrible when some mud or dirt has got inside the car. These days we tend to use a light grey. Light grey is fairly neutral and allows for future external colour changes. Nothing special about the paint either. We use a single pack, rust preventative enamel with off the shelf colours. 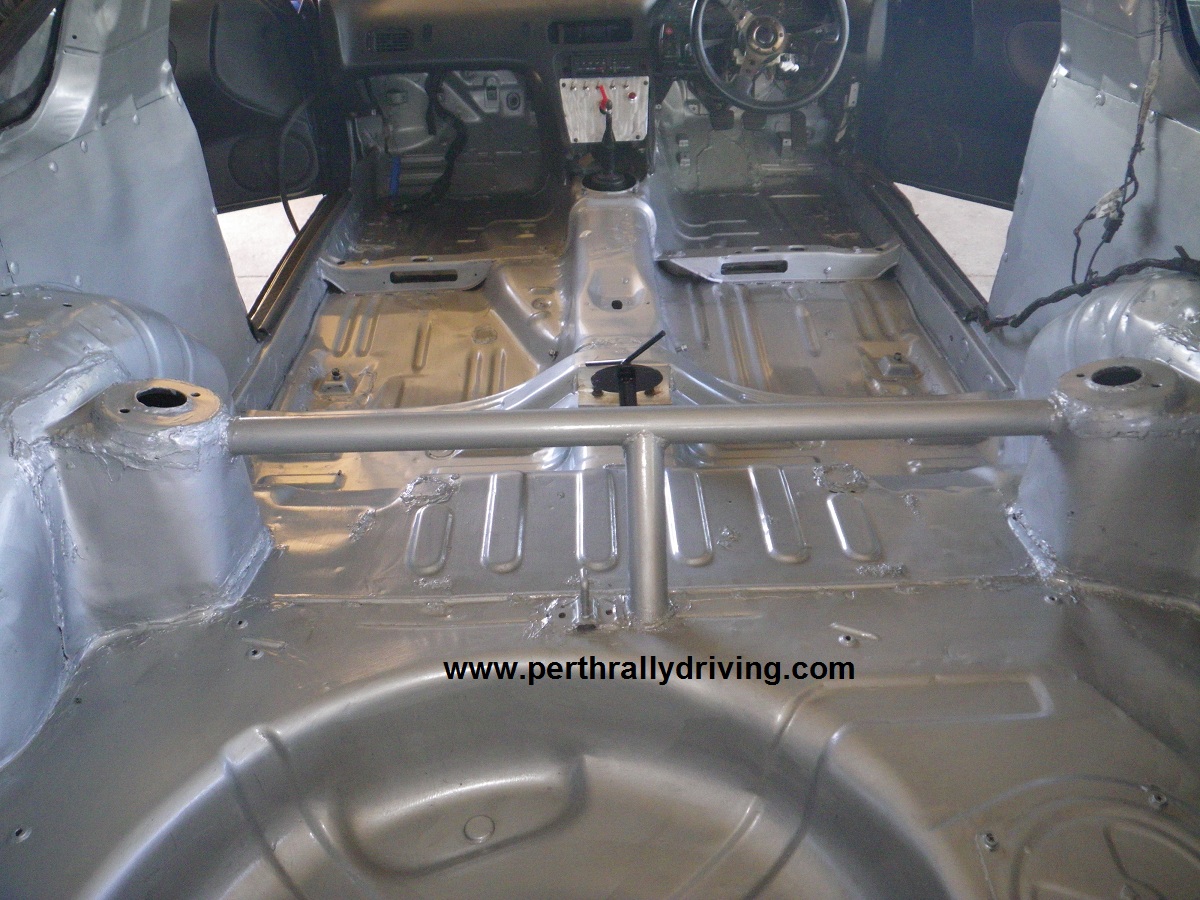 Any one of the brands will do, we just note which brand and colour for future touch ups or interior re-paints. The rust preventative paint will not only protect the metal work and welds from rusting, it is also self priming too. The 180SX was treated to an Aluminium colour, this colour was chosen as the paint supplier was out of light grey and time was short.
With the cage painted in around 45 mins, it was time to start on the interior of the car. Before we started, the interior was given a good vacuum, wiped down with a rag dampened in thinners and we checked all the Sikaflex had set. Out with the brushes for phase two of the painting operation. It took roughly 2 hours to paint the whole interior of the car from front to back using a brush. On a hot afternoon, it was a relatively easy task to finish off the day. The beauty of using brushes is the set up and clean up. No mixing paint, no masking up, no washing out spray guns, no sweaty spray mask or overalls, no fuss. Just drop the cheap brushes in some turps, wipe the paint pot and re-seal the lid. Once the bulk of the interior work is complete, the paint work will receive a touch up here and there as required.
By the next day the paint had cured sufficiently to at least get the cage back into the car. This meant not worrying about the cage getting knocked

over or taking up valuable space. The cage was duly assembled in the car and all of the clamps drilled and bolted. The last part of the cage install is to fit the side intrusion bars. This will be done after most of the interior fit out is complete to allow easier access into the cabin.
With the bulk of the hot and dirty work out of the way, we were able to focus on building the rally car. When we got the car, the Wolf 3D was just floating around loosely under the carpet. Why someone would spend the money on an after-market ECU and then let it sit loose in the passenger foot well, susceptible to damage is beyond us. We did try to chase down factory mounting brackets from Wolf, however with little support from the manufacturer, we made up our own mounts 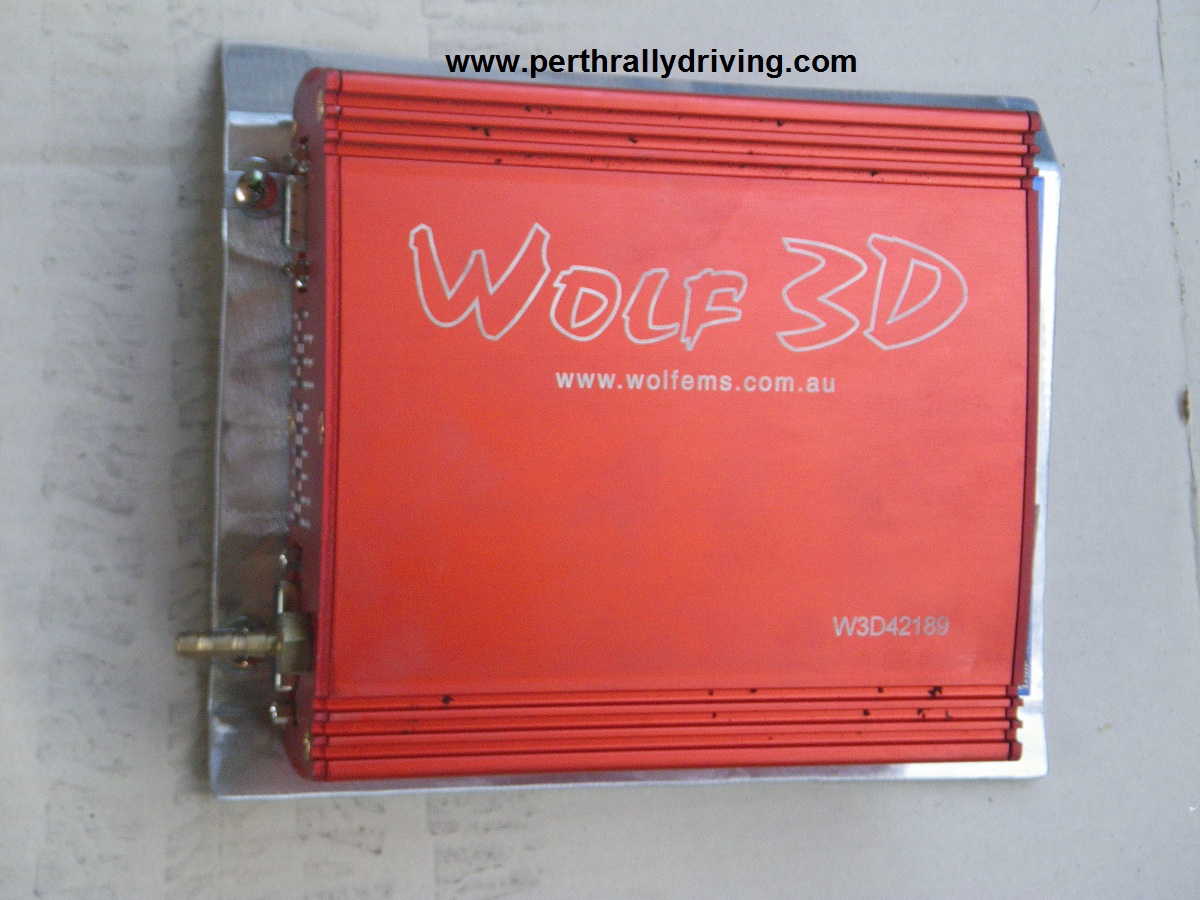 and fabricated a plate to bolt the Wolf into the car. Where the A/C unit once resided, we used two factory threads on the bulkhead and tightly bolted the Wolf in place, well off the floor and out of harm’s way.
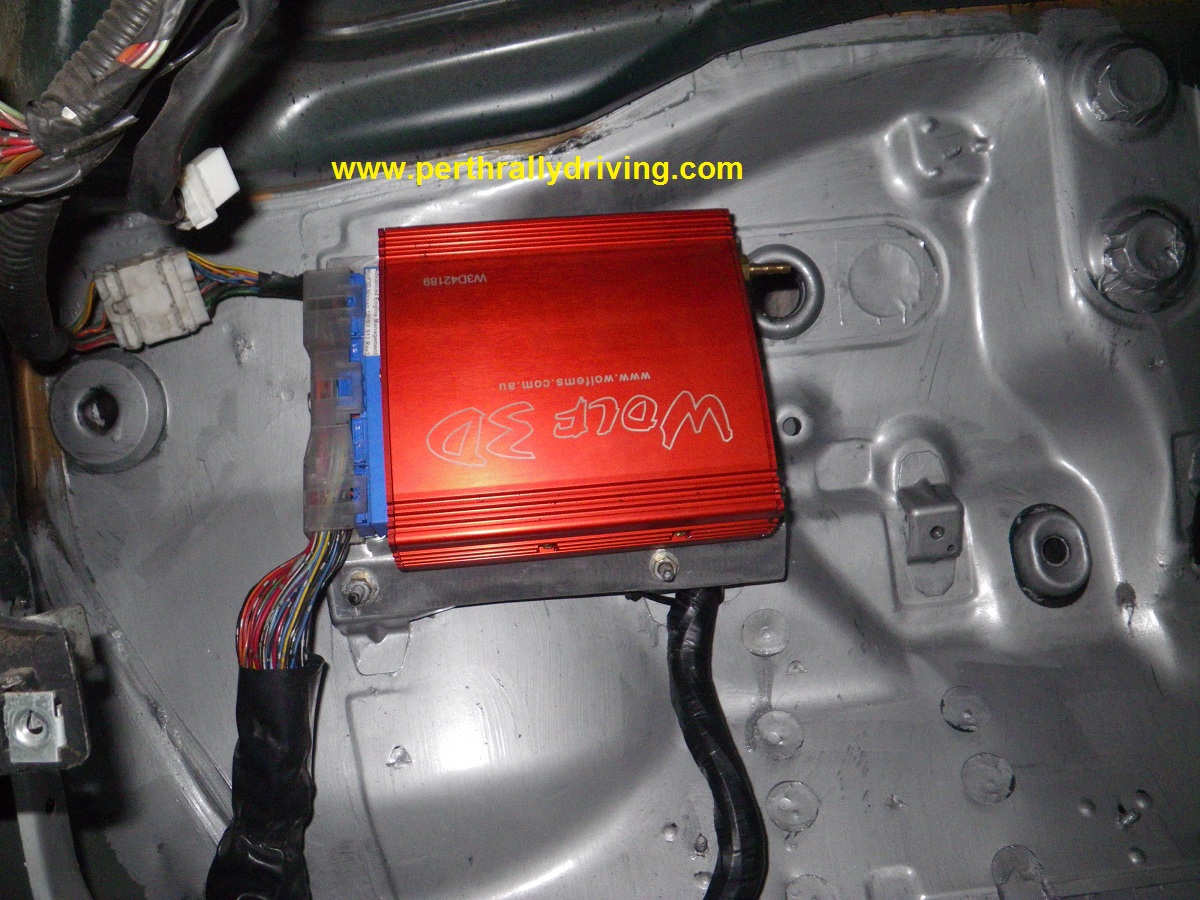
The Wolf has been mounted upside down to allow connection to the 180SX factory wiring loom and also to make it easier to access the tuning ports and MAP sensor nipple on the side of the ECU.
Another small plate of 2mm aluminium was cut to fit over the factory handbrake cable hole in the trans tunnel and we
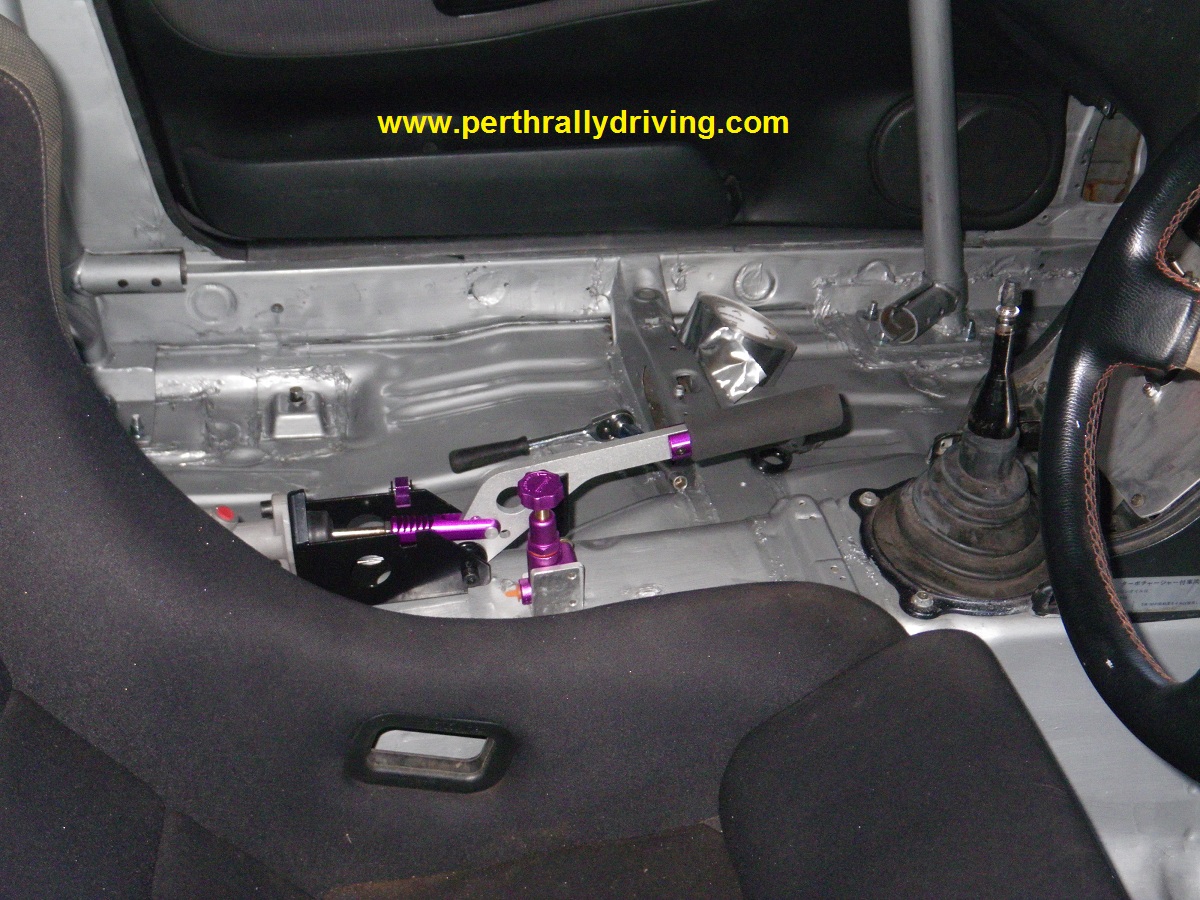
utilised the two handbrake cable mounting threads to bolt the plate into position. The hydraulic handbrake lever is quite long and the master cylinder sits well back, which requires the extra plate for support. Mounting holes were drilled through the transmission tunnel/new plate and the handbrake was bolted into position. A section of aluminium angle was then cut, drilled and tapped to bolt the brake biasing valve into position,
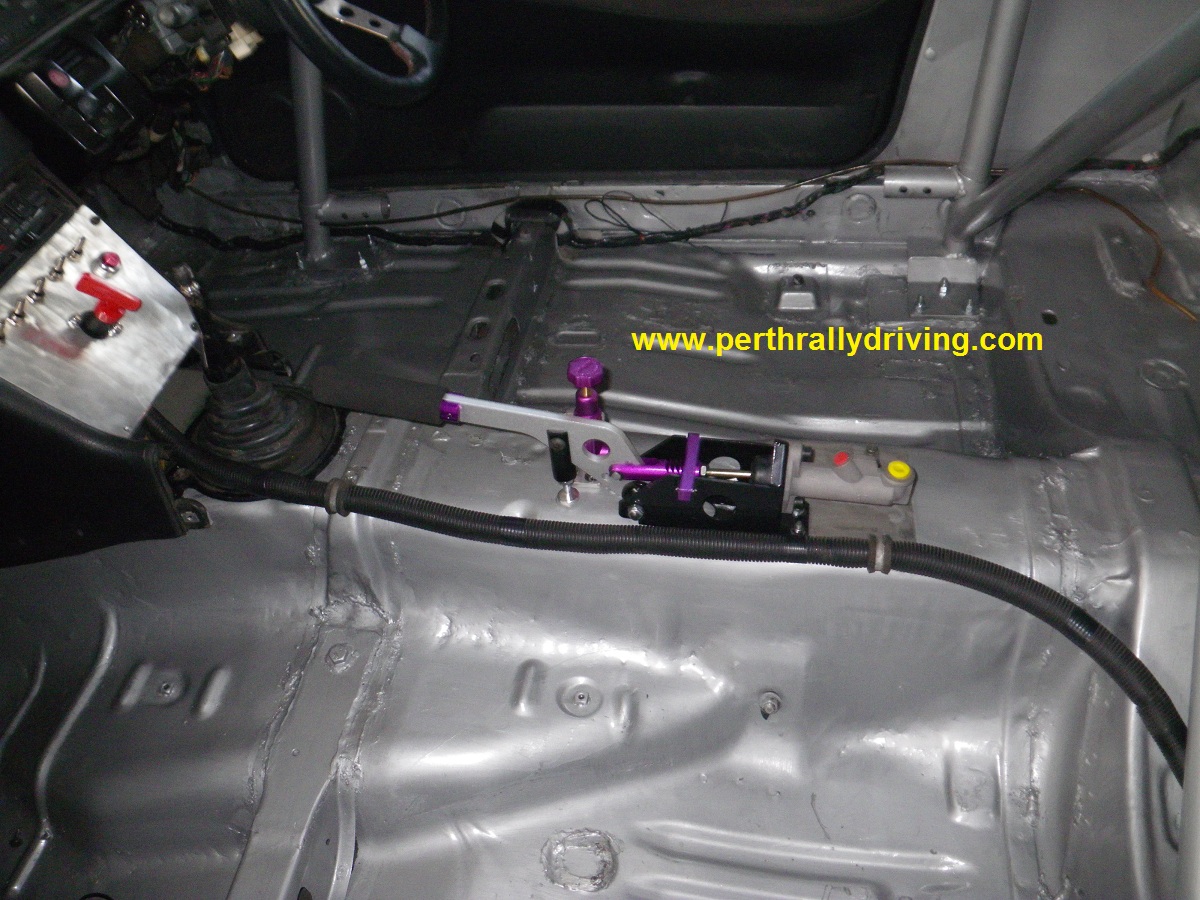
just to one side of the hydraulic hand brake.
With the brake plumbing in the near future, we turned to the battery electrics. We are using a Gel Cell Odyssey battery in the 180SX and it will be mounted in the rear of the car. We ran a H/D cable from the battery up to the kill switch on the dash and terminated it. A hole was then drilled through the bulkhead close to the trans tunnel for a second length of cable from the kill switch to the electrics in the engine bay. The one hole in the bulkhead will have a rubber grommet installed and house both the battery cable and brake line running to the hydraulic handbrake/rear brakes.
Next post will cover continuation of the interior fit out, including electrics, brake plumbing and seat mountings.
More build articles here
