
Taken at one of our Rally Driving Experiences in May 2013
We’ve added a few photos from some of our Perth Rally Driving Experiences.
Click Here to see the gallery.
The most crucial part of any Rally car build, Brakes & Suspension.
Most people think that the focus of a competition car should be on the engine to produce more power and then the drive train to take the extra power from the engine. It’s a classic mistake.
The primary focus should be on the brakes and suspension. Get the most out of the available power you have, then worry about more power later.
For the 180SX Rally Car, we opted to use STD gravel suspension. Sometime in the near future we’ll create a video and/or pod cast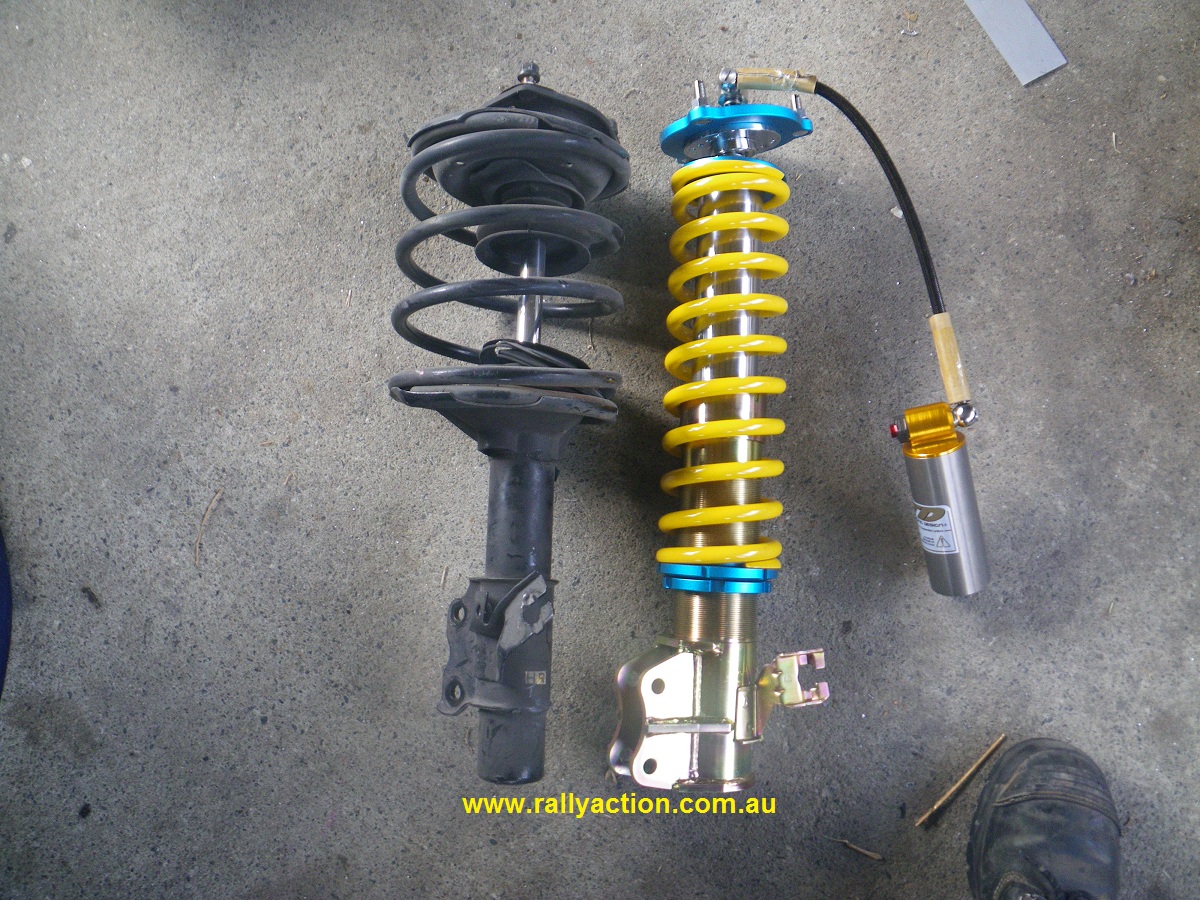 review of STD gravel suspension. For the time being, let’s just say that on paper the specs looked good and the price was considerably less than the other established brands of Gravel suspension available in Australia. We opted for the STD 50mm, remote canister units, reasoning that we’d fit the largest suspension we could into the car. This is the first set of Gravel suspension STD have made for a S13, so we’re also providing feedback to the factory for development.
The S13’s use a simple damper set up front and rear which is fairly quick and easy to remove and fit. We’d already removed the rear dampers during the build and the standard front struts were out on the ground in a few minutes. Read more on 180SX Brakes & Suspension…
This is the first opportunity I have had to update the build thread for several weeks. With the amount of work required to prepare a new car and team to tackle the largest rally in the WA calendar, the blog has had to wait until after the Forest Rally for an update. I’ll cover how the car went at its debut event(s) in a future post.
Back to the build thread.
Our attention turned to the engine bay and external items as soon as the interior was completed.
The boost plumbing was first on the list and the unsightly rubber hoses and multiple Tee pieces we’d inheritted with the car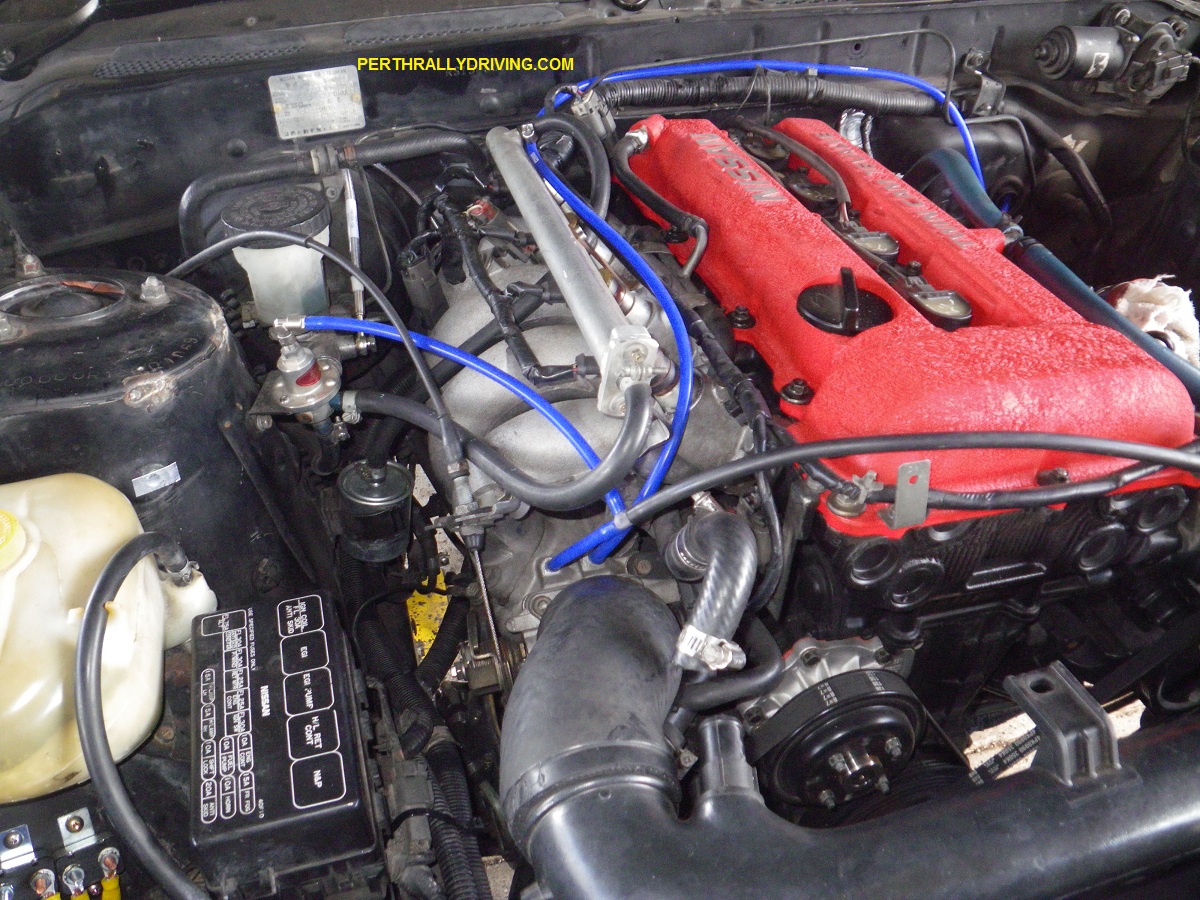 were removed. We fitted new silicone hoses and simplified the plumbing to ensure everything will work properly. We also re-addressed the intercooler set up. Initially we had the CA intercooler fitted and were planning to run an aftermarket BOV in the engine bay.
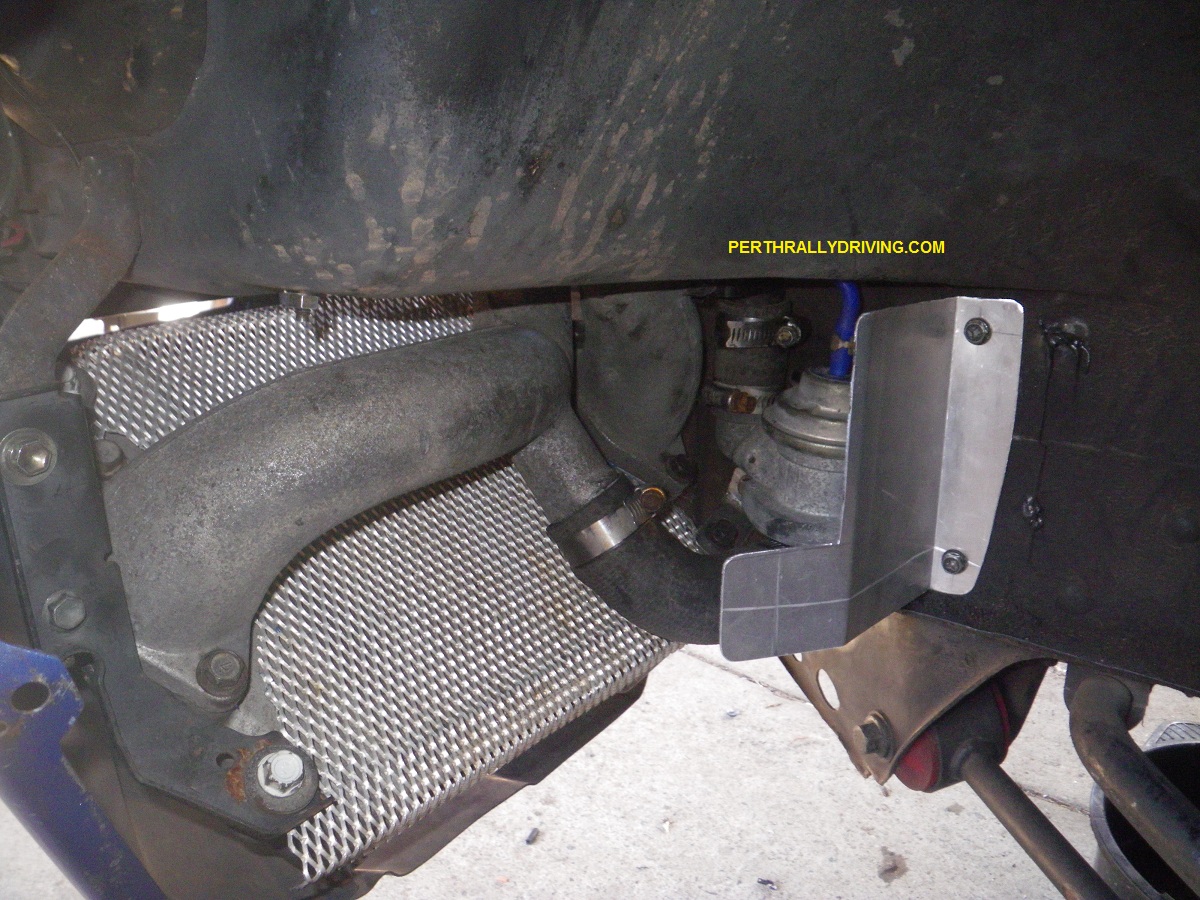 With limited space and the factory intercooler pipes sourced (finally), we realised that we’d be better off with the SR intercooler and standard BOV which all sit in front of the LHS wheel arch. An alloy guard was fabricated for the BOV and bolted into place with the SR intercooler and hoses. We fitted the rest of the parts and worked out what space we had before connecting all the pipes up. Read more on 180SX Rally Car Engine Bay…
If you’re buying a gift for someone else or wanting to Experience Rally Driving yourself, you want the best value for money
Why should you pick us for your Rally Driving Experience? 
Unlike some other companies that offer Rally Driving Experiences, we’re West Australian owned and operated. Also, we’re actual Rally Competitors who are heavily (and regularly) involved in WA Rallying.
What does this mean for our participants?
We aren’t an “Experience Farm”. We don’t pack in as many people as possible into a session and pay little regard to whether participants have a good experience. We genuinely want to see our participants enjoy themselves. One of the dot points of our mission statement is to encourage more people to become involved in Motorsports. We’ve had several of our previous participants come through our Rally Driving Experiences and go on to compete in Club Level Motorsport and/or full Rallying.
Read more on Things you should know about our Rally Driving Experiences…
It has been some time since I had a chance to sit down and update the build on the 180SX. We haven’t been idle since the last post, in fact we have been putting in some big hours to get everything sorted. At the end of Feb we were at a car club Motorkhana and in early March we started running our Rally Schools for 2013. I also misplaced the camera with build photos for a few days as well.
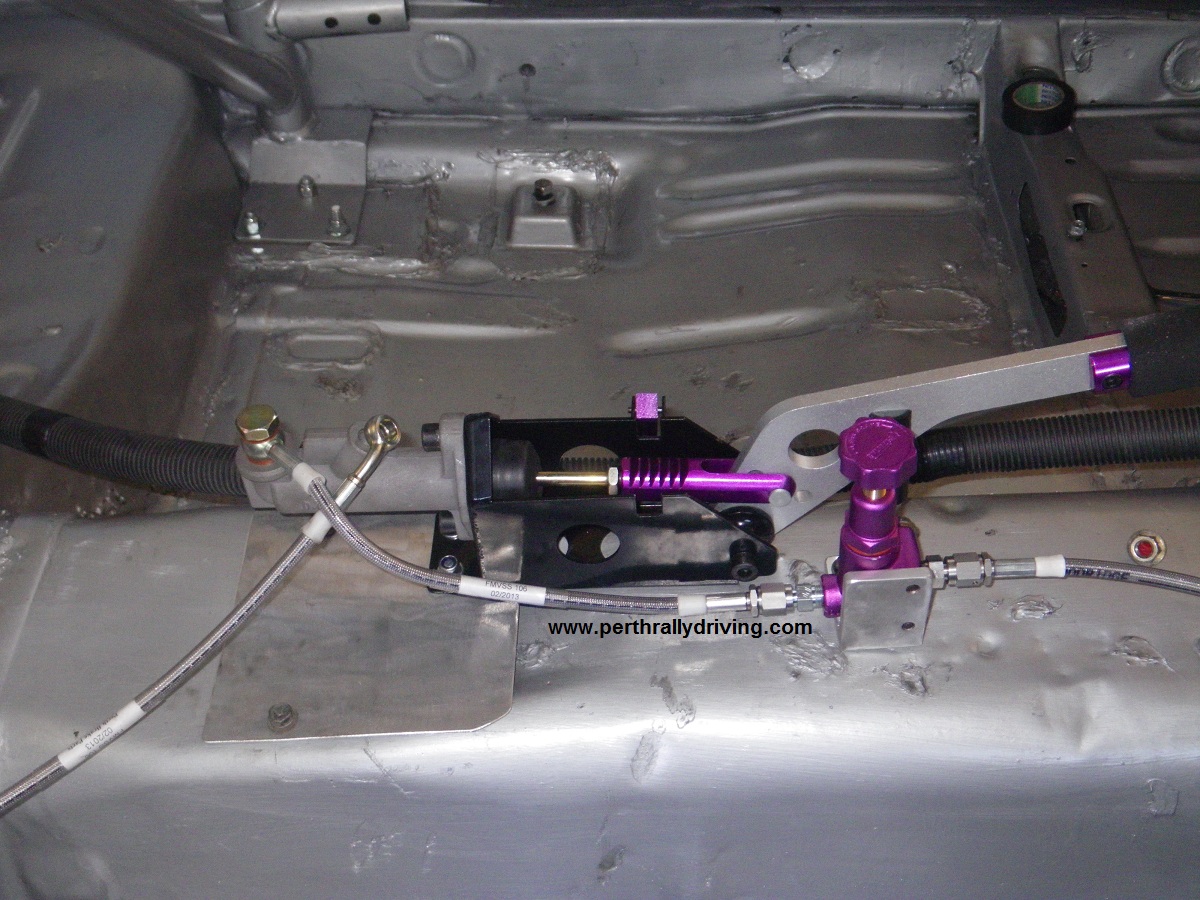
Following on from the last post, we fitted some braided brake lines from the master cylinder through to the brake bias valve, hydraulic handbrake and out to the rear wheels. We usually use one of 3 options when plumbing brakes, depending on the car, the customer and the time available. For the 180SX, we opted to have Perth Brake Parts make up the braided lines. We provided the lengths, sizes and fittings we wanted and the lines were made up within an hour. Flexible braided lines were the best option as it is easy to route the lines through the car when there are many bends and angles close together. On some cars we use normal steel brake lines, bend the lines to suit and flare the terminations. With the braided lines all bolted into place, we bled the system and checked all the fittings for leaks. Read more on Nissan 180SX Rally Car- Interior works part 2…
“Nissan Sikaflex” was the remark from our mate Bryan when I was describing how much sealant I’d removed from the 180SX whilst preparing for the seam welding. Bryan’s remark wasn’t far from the truth! The defeatist thing about seam welding is that you remove all the sealant, stitch weld the seams then put a bead of sealant back in again. That was exactly where we were, once we had removed the cage from the car.
More than a tube of sikalflex has gone into the 180SX in the last few days. “Why would you need to put sealant into a rally car?” you ponder as you’re reading this. Good question. In some rally cars there is little need to seal seams as the factory tolerances on panels are tight. In the 180SX, some pressings have a 5-10mm gap at the seams, particularly around the wheel arch and side panels to the floor pan. When you seam weld, you only put a 20-30mm stitch weld every 100-150mm, not continuous welds. Whilst seam welding is designed to stiffen the shell, it does need some movement to prevent cracking. The new sealant fills the voids and maintains flexibility. Whilst we were at it, all internal welds, small holes, drain plugs and some external welds also had a bead of Sikaflex put over them as well. This allows for filling of any tiny pin holes in the welds and makes sure the drain plugs do not come out. Having gone through muddy puddles in an old Khanacross car where the floor bungs came out (it looked like someone had power chucked mud through the car), we don’t want the same fate in any rally cars. A tip here is not to use race or foil tape to cover up holes in the floor pan. The speed of mud/water and flying gravel on a rally easily rips tape and opens holes. Use the factory plugs with good sealant or if you lose or damage the factory plugs, glue or weld washers in place over the holes. Read more on Nissan 180SX Rally Car- Interior works part 1…
With the new front legs for the cage still on their way from the East, we got stuck into more items on the list.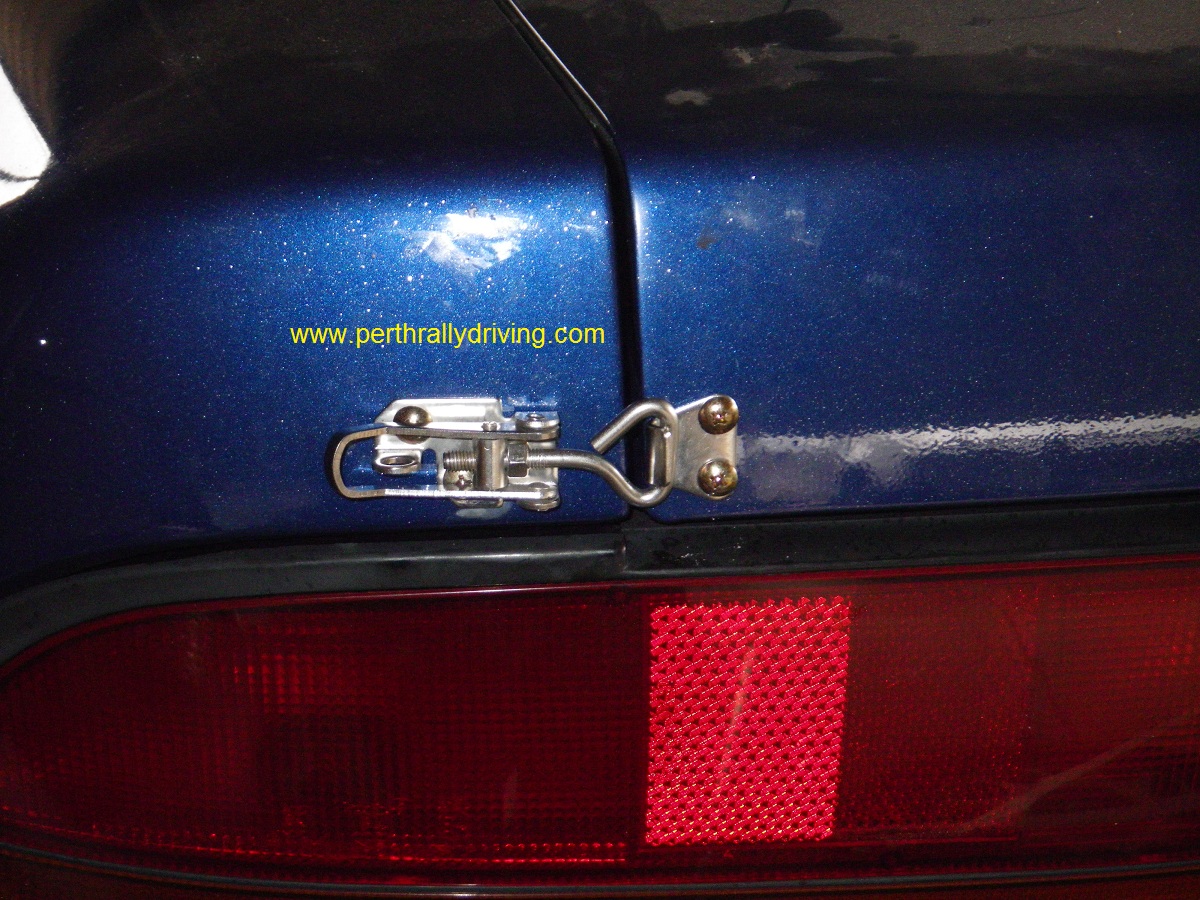
First up the rear hatch was fitted with some new latches. This allowed the removal of the hatch lock mechanism and cable (which also opens the fuel flap on the 180SX). In the process the rear wiper was also removed saving about 2kg of weight in total. Thankfully the gas struts work well on the hatch on this car and we don’t need to add a set of new struts to the list as well.
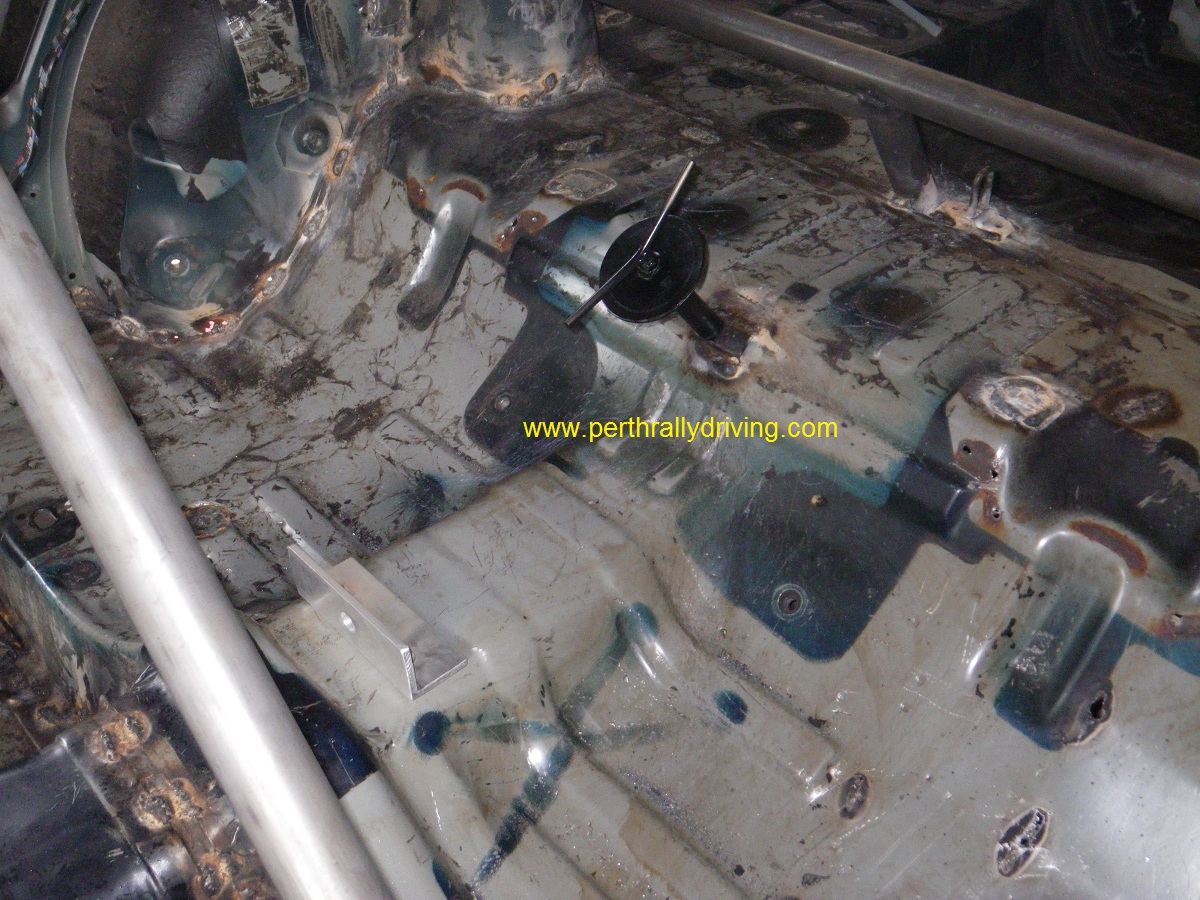 Next we tackled the spare wheel mount. Before we started the work, we had a lengthy chat with the owner. For ease of access, we had initially intended to install the spare wheel into the boot area of the car. This is not the ideal weight balance, however it would make it faster to get the spare out of the car if needed on a rally stage. Instead the owner chose the performance route. This meant mounting the spare wheel in the rear seat area. We had to carefully take measurements and check the position. We welded in a steel plate with captive nut and made up a suitable threaded clamp. A secondary restraint is also required so we bolted a heavy section of aluminium angle to the trans tunnel in front of the spare and welded an anchor point behind the spare wheel bar/strut tower brace. A ratchet strap will be used over the spare wheel between these two points to hold it in place. Read more on Nissan 180SX Rally Car- Spare wheel mount, boot latches and cage install…
It’s been a couple of weeks since I posted on the 180SX build. This has been for a couple of reasons, mostly to do with the roll cage.
The cage arrived just before the weekend a couple of weeks ago and apart from a quick inspection to make sure all the parts were included, we didn’t do much else.
Instead we were at our venue preparing for the start of the Motorsport season and filming videos. Our primary aim was to get some aerial footage for our Rally Experiences and other Motorsport. As it turned out, the guy who had the aerial filming gear developed an oil leak in his car on the way to our venue and had to turn around and head back to Perth. Instead we used our cameras and made this video….
After the weekend we were stuck back into the 180SX and ready to get some serious build time invested. Before cage fitment started, the dash was completely removed which allowed access to the components behind the dash. More weight was stripped out by removing the A/C unit and removing some sound deadening along the firewall.
In a gravel rally car, the “Gucci” design is a full tower to tower, weld in roll cage. Fitting a weld in cage takes more time which in turn adds more cost to the build. For speed and budget, the 180SX owner had opted for a bolt in cage. Some people cringe at the idea of using bolt in cages for gravel rally. We have heard stories of why bolt in cages are not ideal, however we disagree with most comments. Having personally had a big high speed accident in a rally in 2001 using a bolt in cage, I know they work well. In our accident, the car was crumpled around the cage and we walked away and the cage was fine. Adding to this, over the last few years we have repaired several accident damaged rally cars with bolt in cages and the cages have not moved in the cars at all. At the end of 2011, one of the cars we were running in the team had a big off into a tree and stumps. That time the bolt in cage was damaged and the car was a write off, however both occupants walked away from the crash and a weld in cage would have probably suffered the same fate.
With the seam welding complete inside the car, we decided to weld in 2mm steel plates to the floor where the new cage pads would sit. This is a not a CAMS requirement, however as a bolt in cage was previously fitted to the 180SX, the floor pan had been weakened by the extra holes. The first task was to fit the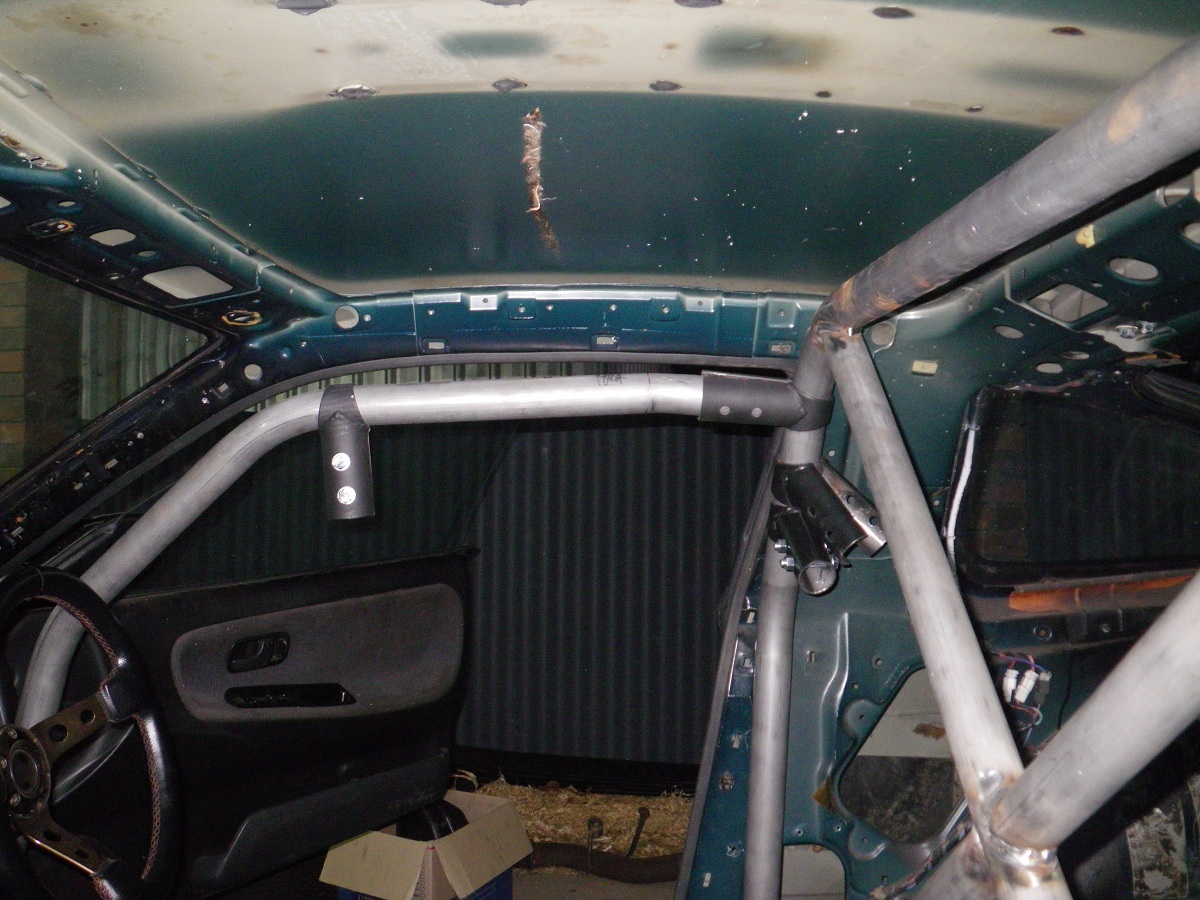 main hoop into position. No major hassle and the first couple of bolts were installed to hold it in place. Next task was to fit the front legs. This is where we ran into problems. They say a picture tells a thousand words, so have a look at the pictures. The front legs just looked far too low in the car. With the side bars fitted, short of being a jockey or a contortionist, there was no way to get into a race seat in the car. After some head scratching, we decided to see if we could raise the front legs and bring them up tight to the roof line
 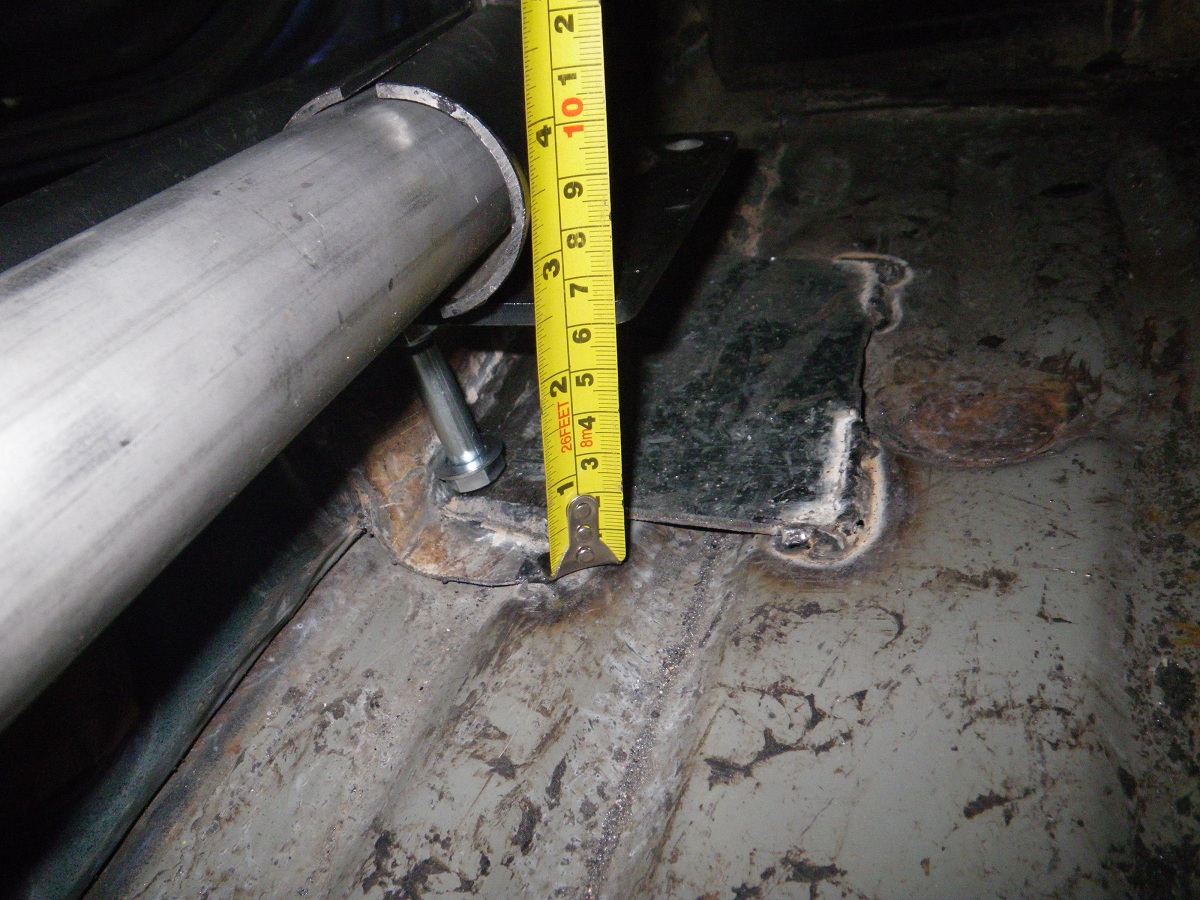 where we thought they should sit. It ended up the front legs seemed 60mm short. We took some photos and emailed the cage manufacturer whilst looking at other solutions.
The best we could come up with was to fabricate steel box sections with captive nuts for the front legs to sit at the right height. This is not an un-common practice. The OMP bolt in cage for the GC8 WRX’s are actually supplied with a weld in box section to mount the front legs tight against the sill.
Just as I had cut all the parts out and tacked the box sections together for test fitting, the manufacturer rang back. They thought they may have made the front legs too short by 60mm and would fabricate a new pair and freight them to us ASAP. The cage fitting would have to wait until the new legs arrived.
With interior work delayed, we turned our attention to other parts. First we fitted the bonnet pins. The pins we opt to use are a slide type which by modern standards are considered an old design. There are some new pins on the market now that sit flush with the bonnet and look flash, however are time consuming to fit and need to be precise to line up correctly. All well and good when the panels are straight. It would be interesting to see how easy it is to open or close a bonnet if the car had suffered a tap to the front end. At least with the pins we fit, we know we can get them on or off and having been around for a 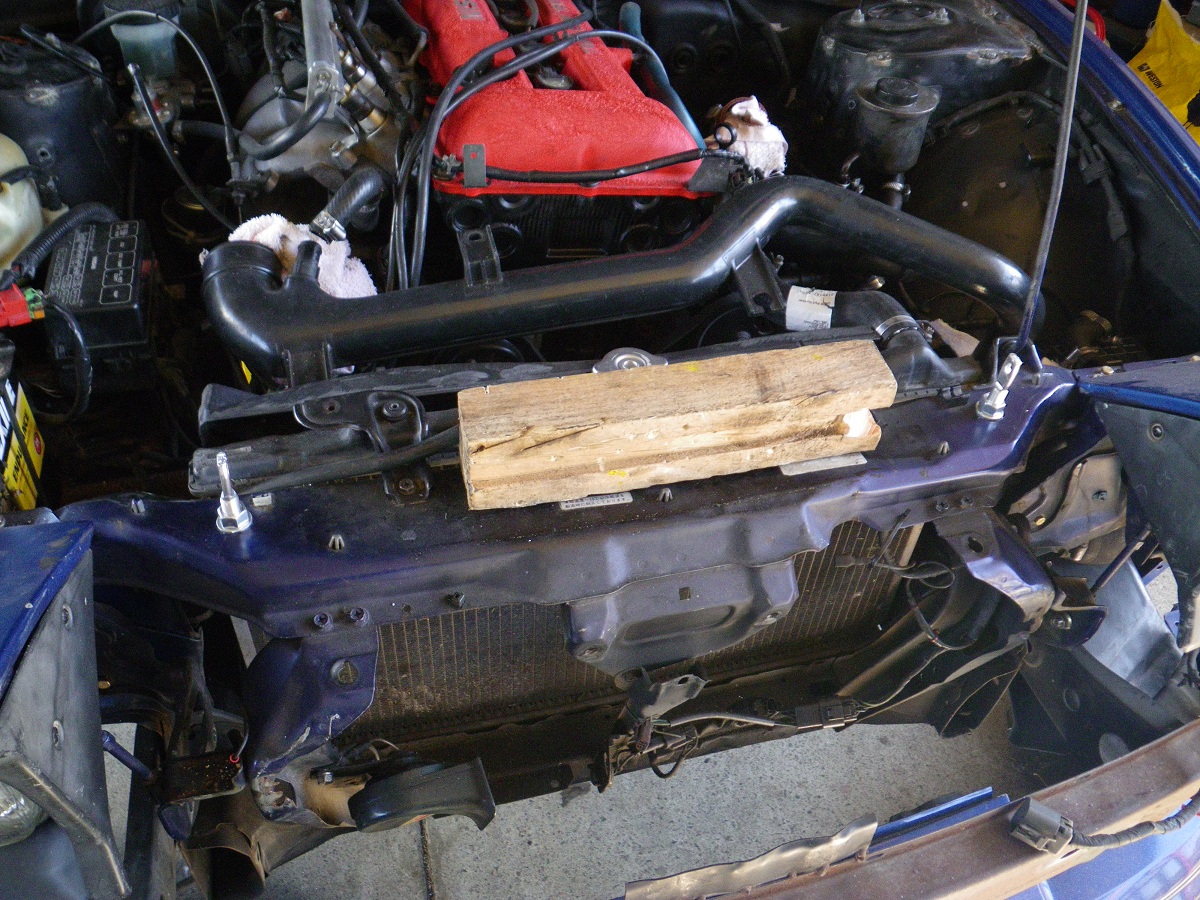
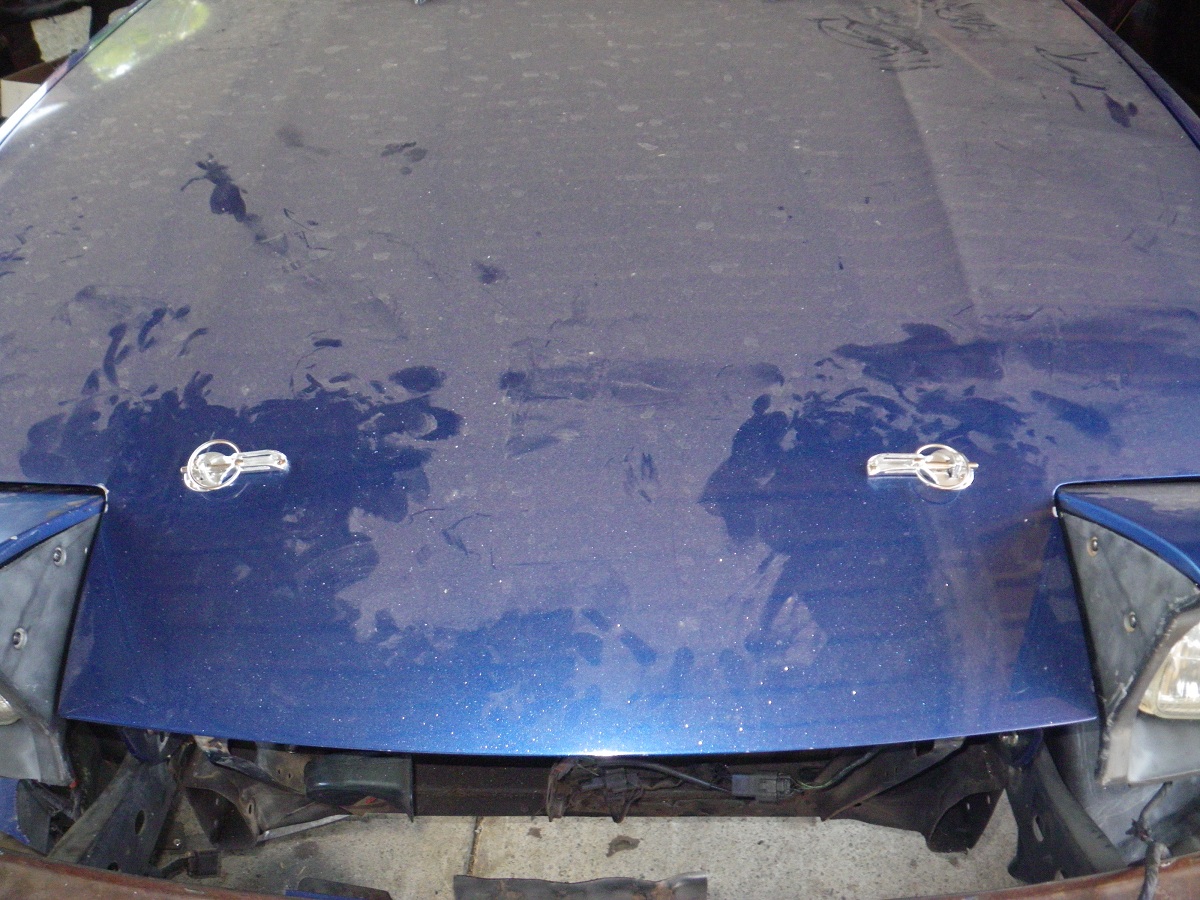 long time now they are cheap and very reliable.
There are hard ways and an easier way to fit bonnet pins. Over the years we have perfected the easy way and now a set of pins doesn’t take too long to fit. The good news is by using the bonnet pins, a few more grams can be removed from the weight of the car by taking out the bonnet release mechanism and latch. The rear hatch will also receive similar treatment.
At this stage the pins are temp screwed to the bonnet as they will be removed before the car is painted.
Next up we tackled the seat mountings. Anyone that has tried to fit race seats to an S13 will know what fun this is. We had to take several measurements and carefully look at how to tackle the mounts. The standard seats have different height mounts on each corner and the passenger side floor has a large curved section to facilitate the clearance for the cat converter under the car.
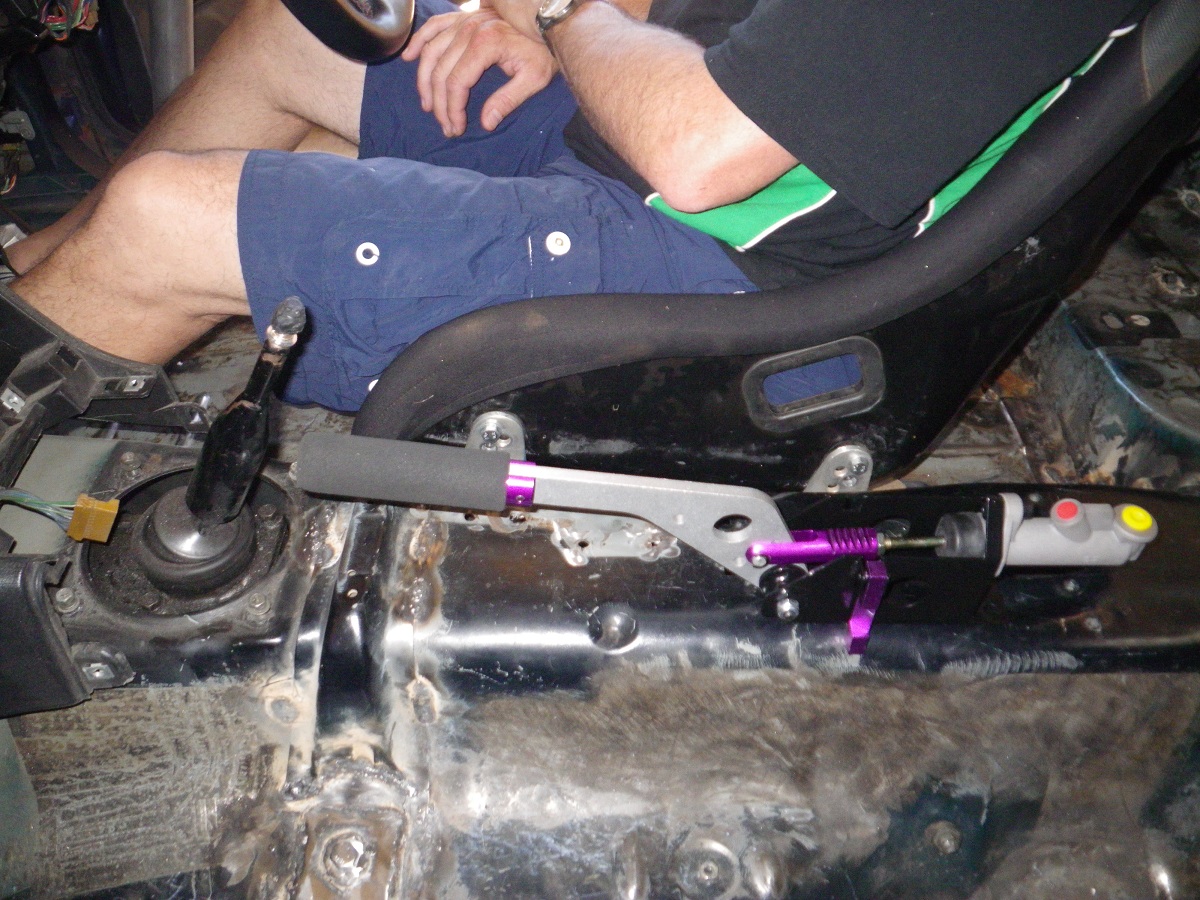 In something like a Commodore, welding in seat mounting tubes or fitting higher seat mounts to clear obstacles is easy. The Commodores have plenty of space and clearance and you need a high driving position to see over the long bonnet. In the 180SX, it is a different story. We had to be conscious of the clearance to the cage, particularly the front legs. The room is tight in the cabin and the seat mounts need to sit as low as possible. We came up with the idea of utilising the factory seat cross member, however it was cut down on the tunnel sides and 2mm steel plates with captive nuts were welded in place to get the mounting points parallel. This design as least means the front of the seat rails will sit at the same height on both sides of the seats. The rear mounts will be bolted to the factory mounting points, however we may need to make up some custom spacers and use longer high tensile bolts to get everything parallel. Whilst checking the seat mountings, we also checked the position of the hydraulic hand brake and brake bias valve for correct position. These itmes will be fitted to the car and plumbed in once the cage is installed and the interior painted.
With still many items on the list to be completed, some mechanical tasks were tackled. Whilst sorting out some interesting heater pipe work around the back of the head in the engine bay, it was discovered that some nuts and bolts were missing from the turbo. The Dump pipe was held on by 3 of the 5 bolts needed and the turbo had 3 of the 4 retaining nuts. It was good to find these issues now and not on a rally when the turbo or exhaust had come loose. Predictably, the missing nuts and bolts were the difficult ones that were harder to access. We fitted new nuts/bolts and spanner checked everything to make sure they were tight.
Into the rear of the car, the fuel pump was next on the list. Finding some forum posts from a previous owner, the fuel pump had supposedly been replaced with a larger unit. Fuel pumps are critical items we take no chances. A new Warlbro pump was sitting on the bench and we pulled the old unit out to inspect and replace. It did turn out that a substitute race pump had been fitted. With no way to confirm the age or condition of the pump, it was removed and put in the spares box in case an emergency pump replacement is ever required on a rally. In practice, we usually replace fuel pumps once a season anyway. 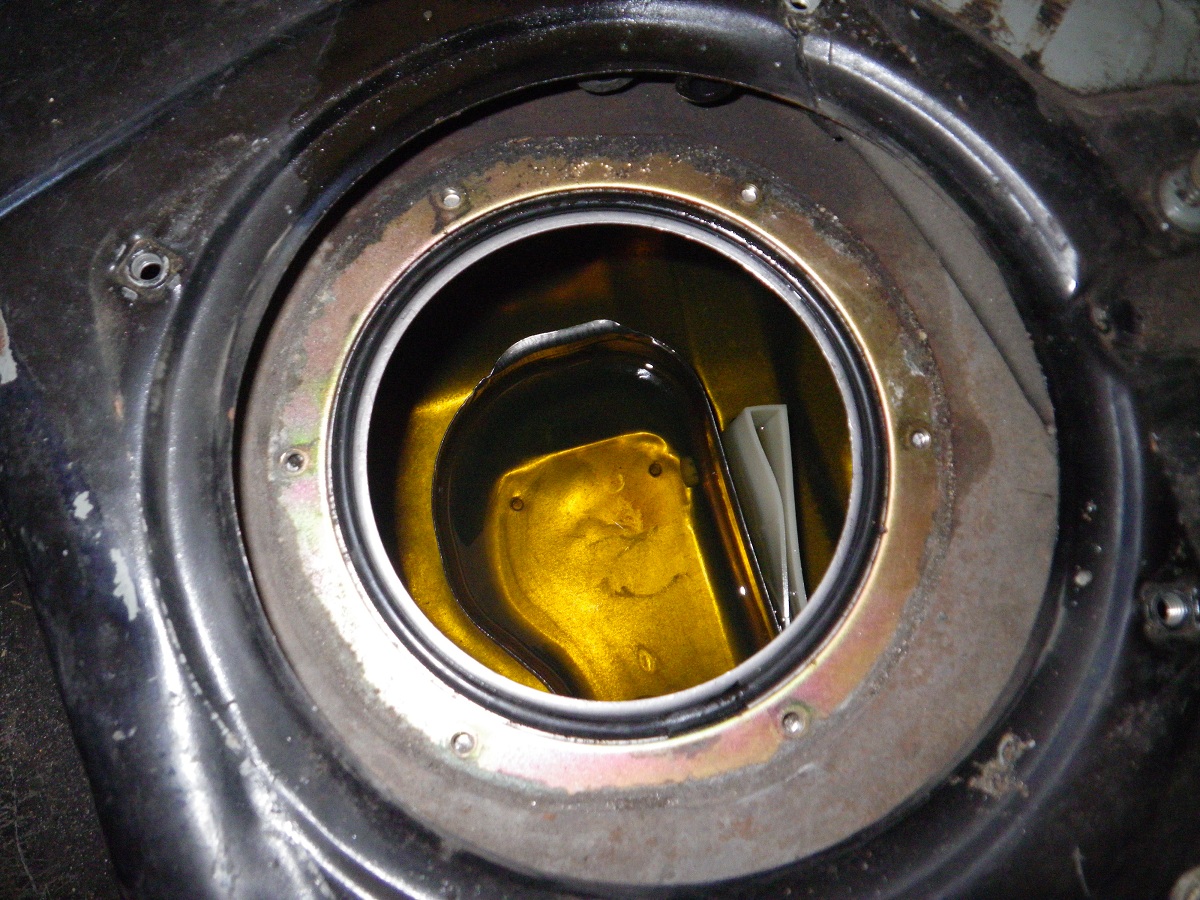 The vibrations and shocks in gravel rallying can easily wear out the innards of a fuel pump and a new pump is much cheaper than a blown motor from leaning out due to low fuel pressure. Whilst the pump was out, the fuel tank was inspected inside. We were happy to find a clean tank and the factory swirl pot firmly fixed into position. For our first look inside the Nissan fuel tank, it was good to see a decent sized swirl pot. The early WRX’s didn’t have a great swirl pot in the tank and to counteract the issue, we don’t let the rally cars leave service without at least ¾ of a tank.
Replacing the fuel pump was straight forward, however we had to take care of some bodgey metal work. To fit the larger pump, the factory pump support had been twisted by a previous owner. The angle was sharp and the bent steel was rubbing on the fuel pick up at the base of the pump. The support was cut back and filed smooth. The steel outlet pipe above the pump had been roughly cut to fit the larger unit. Sharp burs had scored the inside of the rubber hose connecting the pump to the outlet line. The steel outlet line was also filed back smooth before a new hose and clamps were fitted with the new pump. These issues may seem minor and not worth the effort to sort out. In competition, we don’t want to be chasing fuel surge or fuel pressure problems from a tiny split in a hose or pick up inside the fuel tank. Little issues can turn into big problems down the track and take a lot of time to find and rectify if you don’t get them right in the beginning.
Next post will cover the spare wheel mounting and hopefully full fitment of the roll cage.
More build articles here
With the cage ordered, we turned to the front end of the 180SX.
First was to address the front suspension bushes. We did receive with the car a set of unknown brand rose jointed adjustable castor bars. We feel that putting unknown brand, used suspension parts into a rally car is asking for trouble so we fitted a set of standard bars with Nolathane bushes. The adjustable units will end up in the spares box to be taken to rallies “just in case” The worn out front sway bar bushes were also replaced with Nolathane to aid with handling. With a myriad of performance suspension parts available for the Nissans, future developments may include a fully rose jointed front end. We’re going to wait and see how the car handles on gravel with the standard parts before any decisions are made. There is more work to be done in the front suspension, however that will be completed with the brake work.
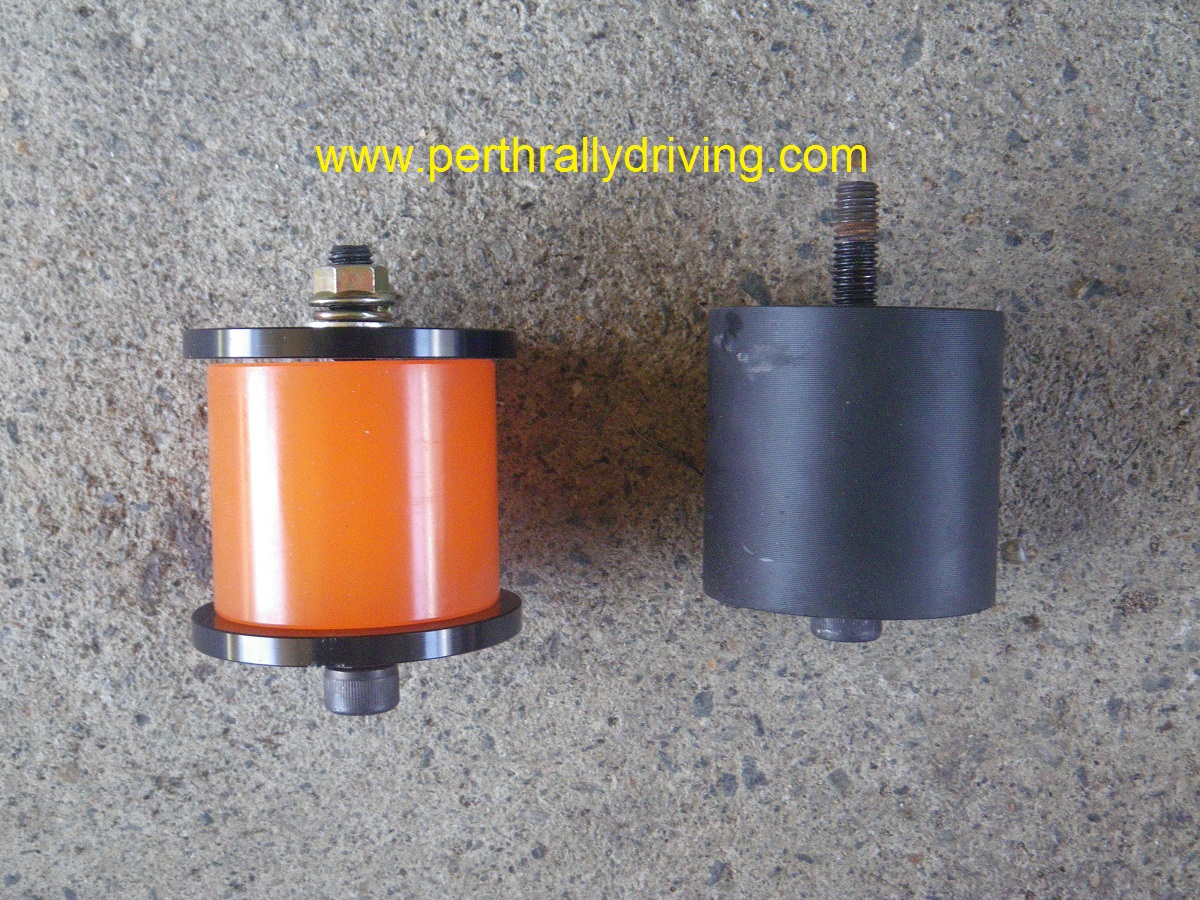 Next up the horrible solid engine mounts were removed. As soon as we got under the car we found both the engine mounts were loose!
 The bolt on the right side only had 2 turns of thread through the nut. Due to the way the engine mounts are set up, it would have been very easy for the bolt to come out and the engine mount to have completely fallen out of the car! That would have been interesting and no doubt led to some expensive damage. The new urethane engine mounts were a straight forward fit and compared to replacing Subaru engine mounts, the 180SX mounts are easy.
The urethane engine mounts should mean the car doesn’t need an engine damper,another for the development list if required.
Under the bonnet, the factory radiator, viscous fan and shroud were all removed. Viscous fans do fail and the last thing we want is overheating problems on a rally. The fan is easy to remove and the factory bolts retain the water pump pulley in place with the viscous hub removed. We followed the common trend and installed AU Falcon thermo fans in place of the viscous unit. To fit the S13 radiator, we had to hole saw out clearance for the top and bottom hoses and trim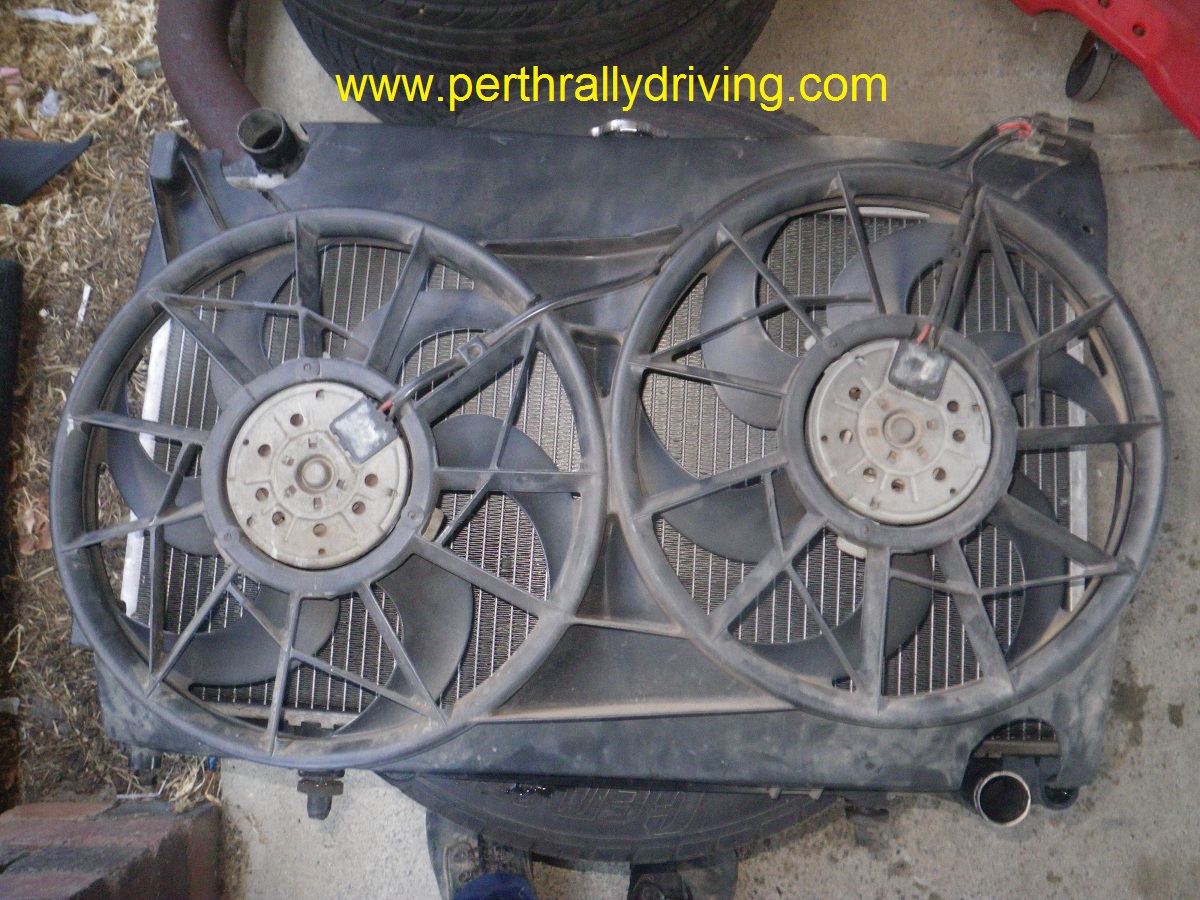 off some lugs. We also took the top lip off the thermo fans to raise the position slightly. With the Ford 4.0L having its top and bottom hoses round the other way to the SR20 engine, the fans sit a bit low with the top lip of the shroud left in place. After removing the top lip, the fans sit higher and the shroud covers the radiator perfectly. The two bottom mounting holes were used on the shroud and some neat alloy angle brackets were made up to pick up two of the side mounts. The whole unit is held firmly in place and will cope fine with the shocks of gravel rally. Using the AU thermo fans reduces the thickness of the whole assembly and provides much more clearance between the engine and radiator. To keep things simple, both fans will be wired through a relay and a manual switch on the dash. With the heat Anti-Lag generates under the bonnet, the two fans will run continuously to keep engine bay temps down. If we find the engine temp too high, we’ll also fit an oil cooler.
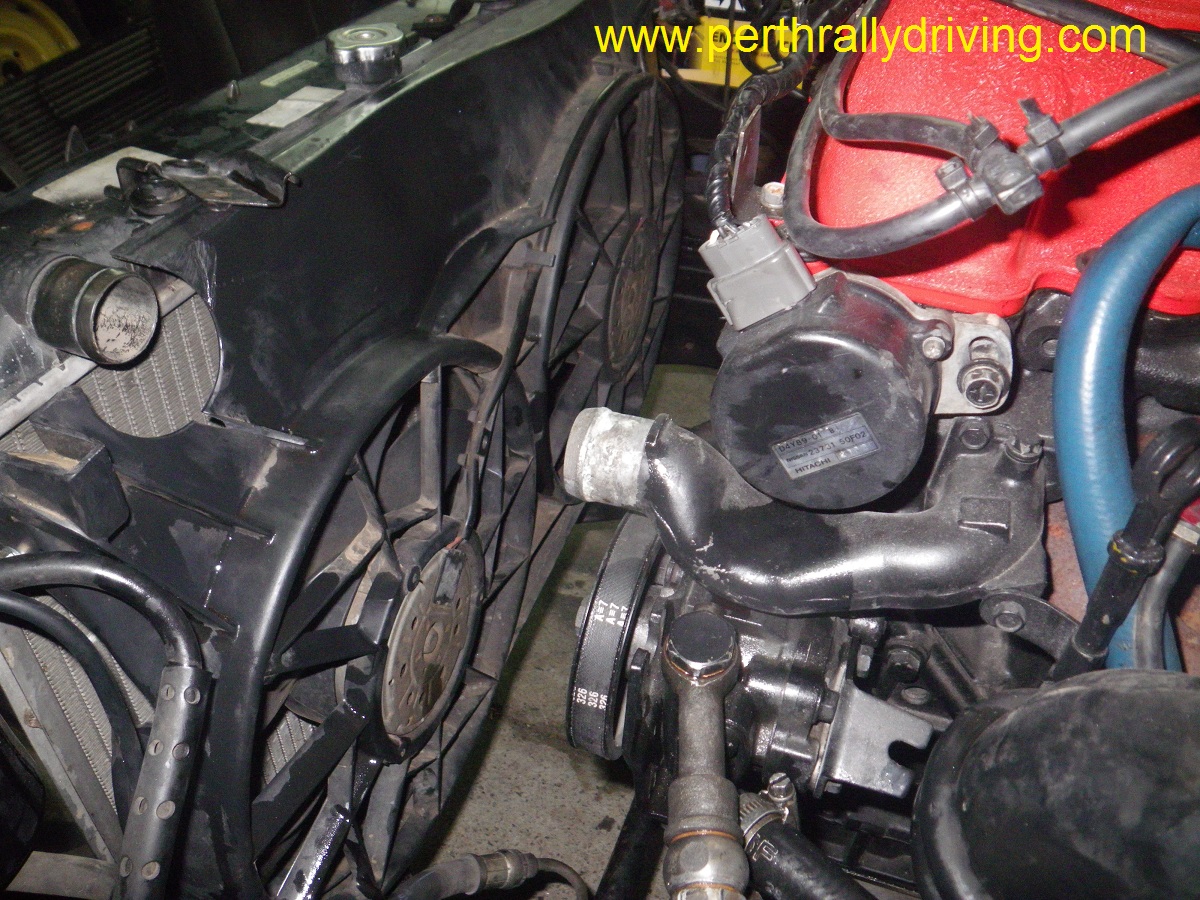 When we went to fit the radiator with fans back into to the car we ran into a slight snag. Whilst the new set up is much thinner, it is wider across the engine bay and doesn’t taper as much as the viscous fan shroud. The factory position of the pressure line to the power steering was fouling on the thermo fan shroud at the bottom on the left hand side of the engine bay. Luckily Nissan have designed the power steering line near the pump with 2 x banjo fittings at different angles. By loosening the nuts, we were able to angle the line away at the pump which provided some flexibility. Lower down a bracket holding the steering line had to be removed from a diagonal cross member, trimmed up and re-drilled with our Makita Cordless Hammer Drill. The bracket was then mounted off the front chassis rail to provide additional support to the power steering line. Whilst we were at it, we re-drilled another power steering line bracket which cured the problem with the power steering lines fouling on the sump.
Under the left side guard a factory side mount intercooler was installed in the car. With the intercooler loosely bolted into place, we soon realised that it would be easy for rocks or debris thrown from the front left wheel to cause damage. Searching around the workshop, we found an off cut piece of security 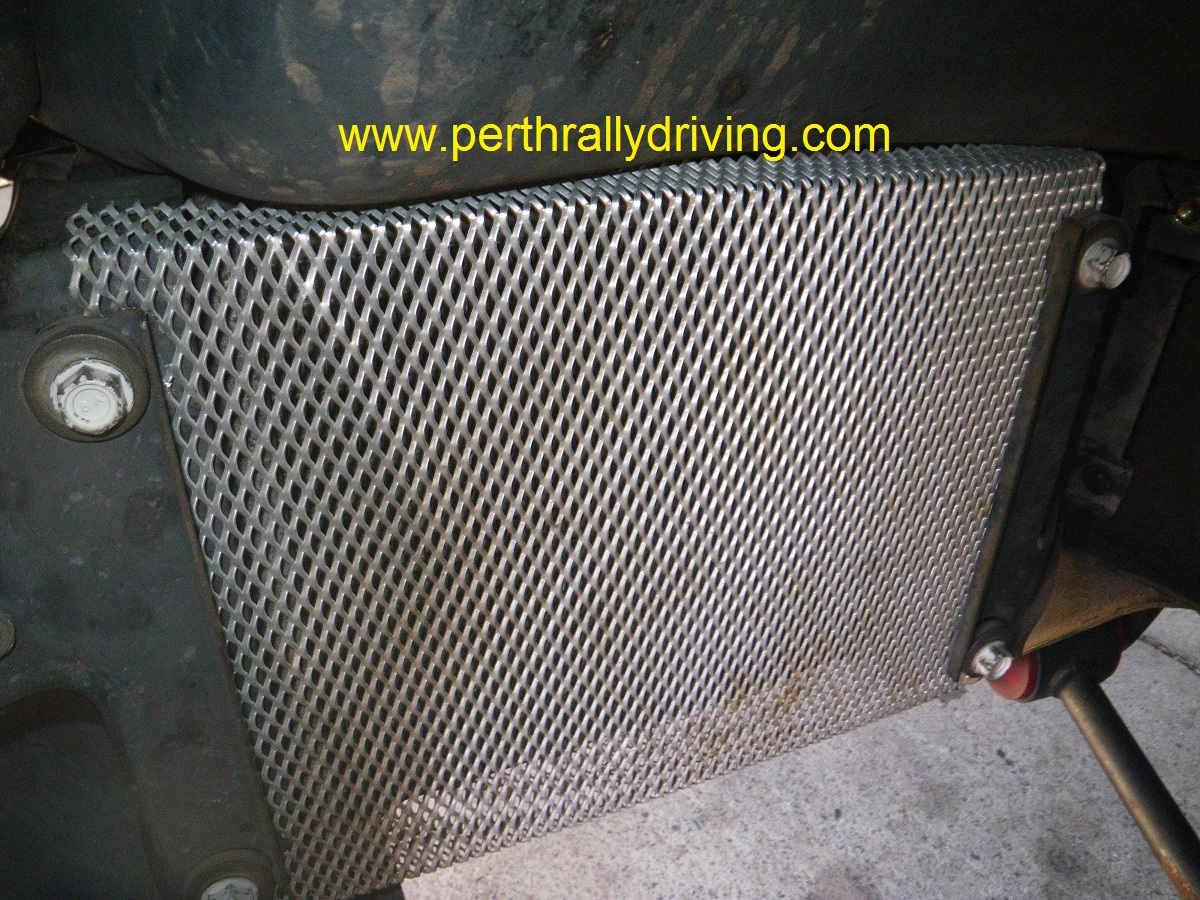 door mesh that was the right size to fit the intercooler. Security door mesh is cheap, fairly open weave (depending on the type you get) and strong. We have successfully used this type of mesh as protection on several oil coolers. With a couple of bends in the pan
 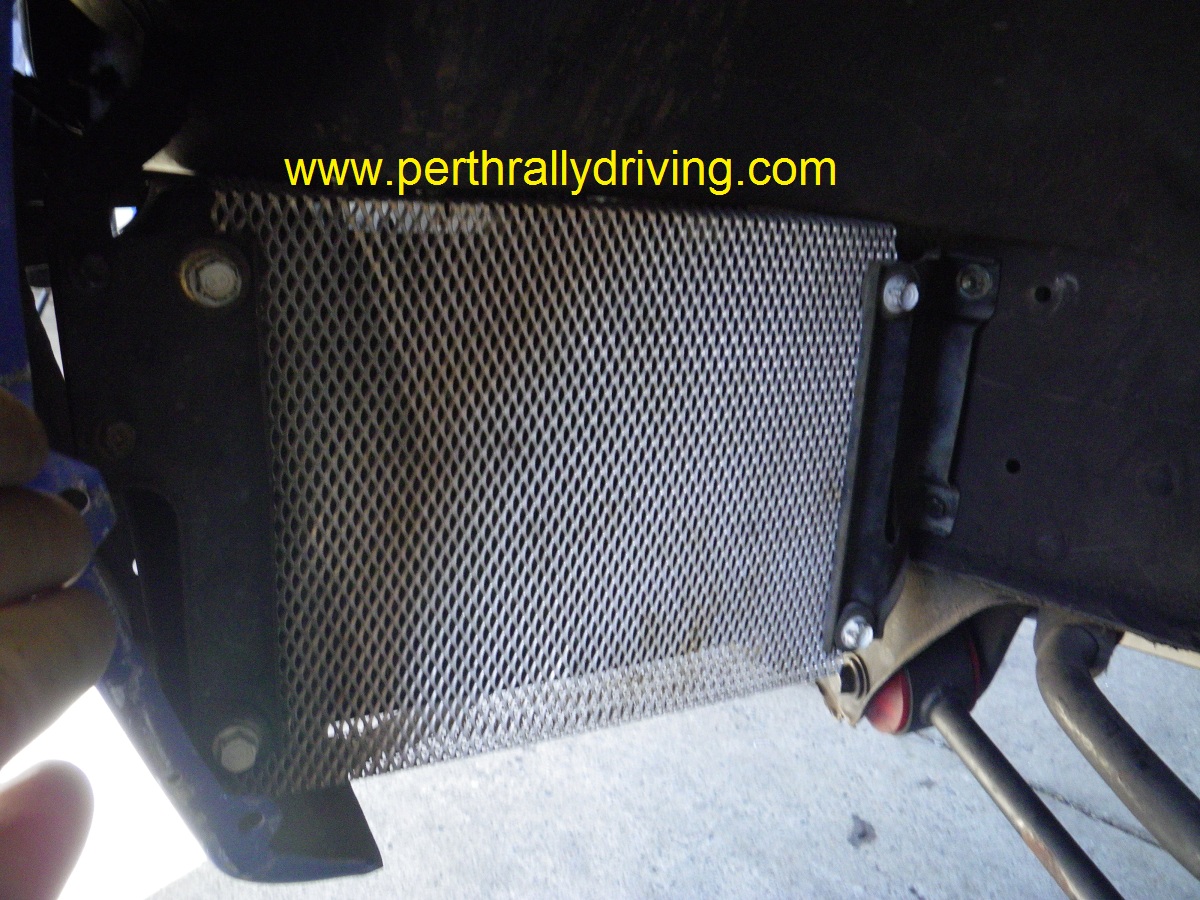 brake and reliefs cut to match the mounting holes, everything was neatly bolted into place. Rocks and sticks won’t be an issue now, however on wet and muddy rallies, we’ll have to clean the back of the intercooler each time the car comes into service.
With no luck yet in sourcing a standard set of intercooler pipes, it looks like we may have to make up the turbo plumbing with silicone hoses and alloy pipes.
If the cage arrives as scheduled, the next post will be detailing the cage install and continuation of the internal shell preparation.
More build articles here
With all the seam welding around the rear sub frame mounting completed under the car, attention was focussed on the rear cradle and diff.
Before the car was pulled apart, we’d already identified the rear bushes all needed attention.
With the cradle out of the car and on the ground, it was apparent how bad the factory rubber bushes were. It wasn’t surprising really. The car is 24 years old 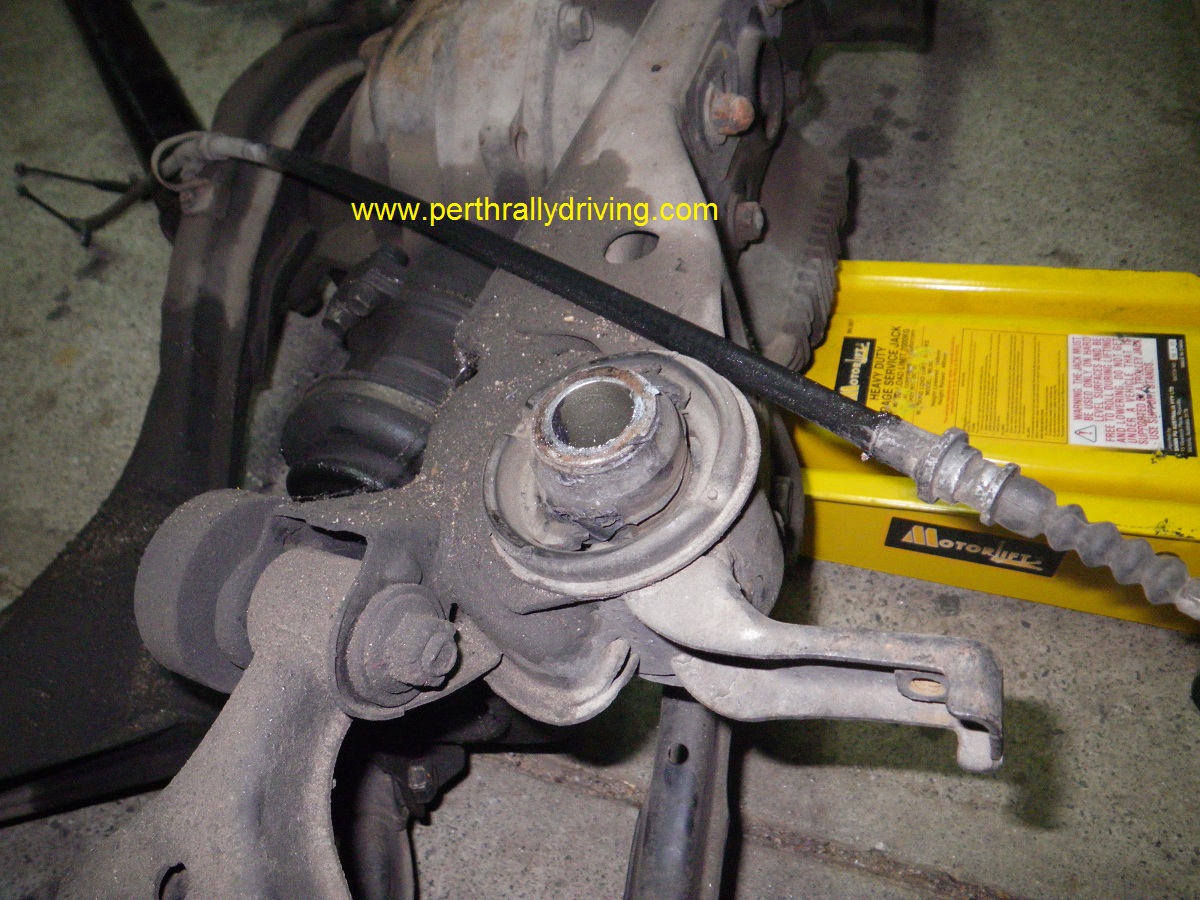 and has spent some time drifting. At one point someone had fitted a set of urethane “pineapple slices” to the rear cradle mounts, this had done little for the completely flogged out sub frame mounting bushes.
Being mindful of the budget, a complete re-bush in Nolathane was going to use up a chunk of cash we could best devote to other areas of the car. At that point we had some luck. The S13 shell we’d originally bought to build as a rally car was found to be harbouring a good complete rear cradle with decent bushes.
Some quick work with the Makita Cordless Impact Wrench and the trolley jack had both rear cradles on the ground side by side.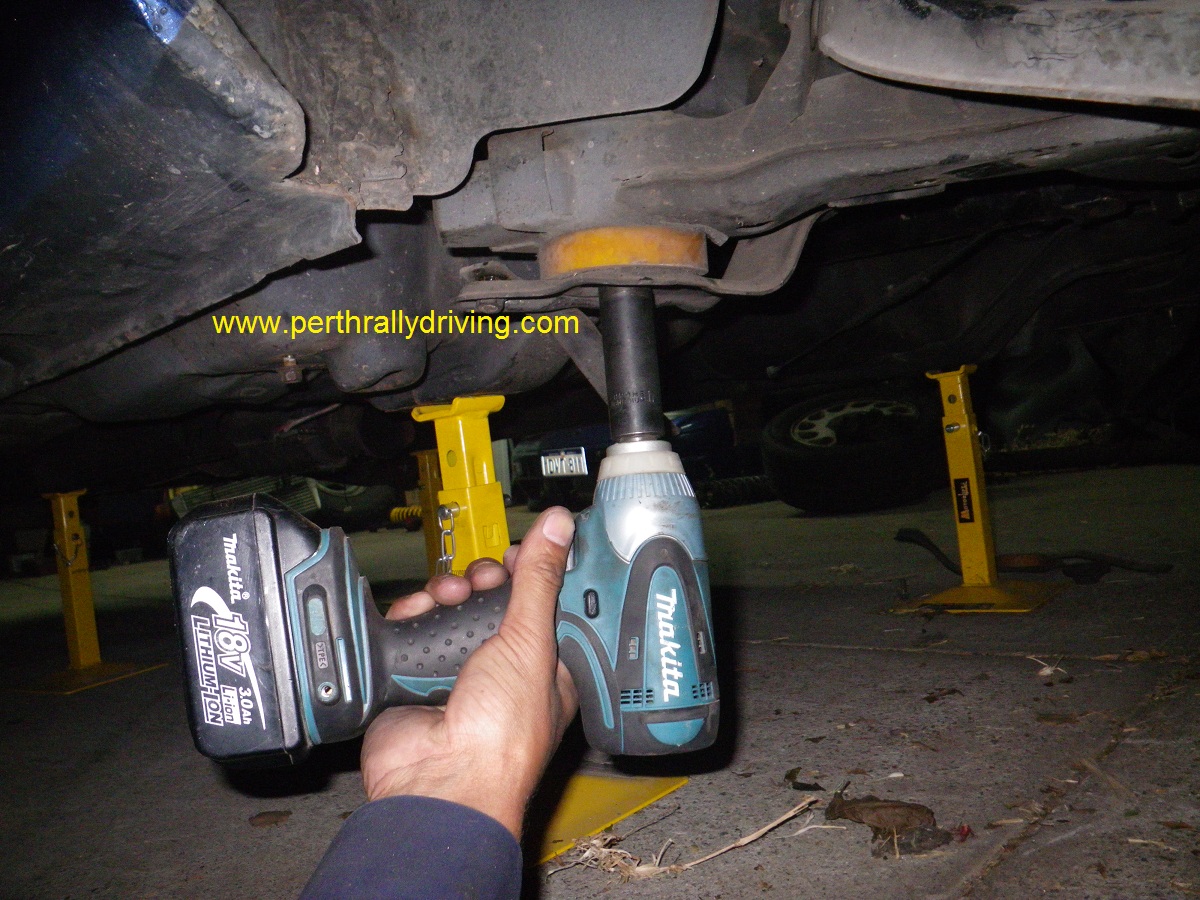
To start with, we had intended to do a complete swap of the rear cradles and cannibalise the old cradle for spare parts to load into the service trailer for rallies. We soon realised the diffs and drive shafts in the cradles were different. The cradle out of the 180SX has a Type X diff in it. The diffs have different length noses (meaning different length tail shafts) and the Type X diff uses 6 bolt drive shafts instead of the 5 bolt units found in the 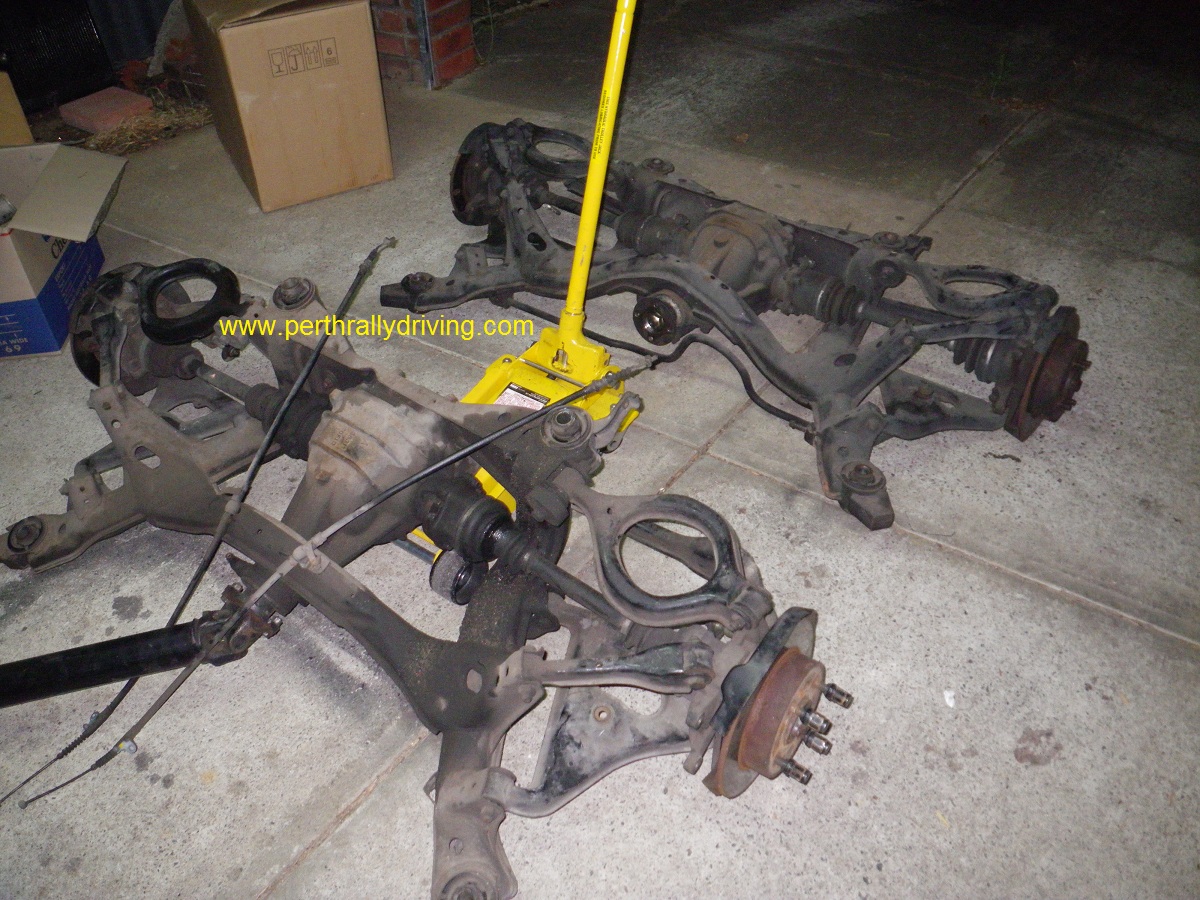 standard S13 rear end. It was another minor win finding a better diff in the 180SX.
The Type X diff was removed from the old cradle along with the shafts and hubs. Whilst apart, the rear ball joints were inspected and the left hand CV boots were replaced (split when we got the car). The rear cover was also pulled off the diff for a look inside. Initially we had thought that the 180SX diff had been welded up as it was very tight. We drained out fairly clean oil, found nothing suspicious on the magnetic drain plug and clean looking internals. Instead of a welded up open centre diff, we found a mechanical LSD. Having a chat to people in the know, the diff is a 2 way mechanical, probably a Nismo LSD. Whilst the diff was apart, the crown wheel teeth were counted to determine the ratio. Most S13’s have a 4.1:1 diff, a Google search revealed that this diff is a 4.36:1, so another win with a slightly lower ratio to help with acceleration.
Everything was cleaned up, a new bead of sealant applied and the diff was reassembled. The Type X diff, shafts and hubs were then mated up to the good rear cradle and everything was bolted back together. Like Subaru have done with the WRX/Legacy platform, Nissan have done with the S13 in terms of working on the cars. So far everything has been relatively straight forward to work on with a logical set of steps to remove and re-assemble parts. I will say this however. Regardless of Nissan, Subaru or any other brand, I am very glad of a Cordless Impact Wrench! With the amount of bolts to remove and re-install, the time taken is greatly reduced as well as the effort to loosen some well tensioned (bloody tight) nuts and bolts. You can read full reviews on the 18V Cordless tools we use here: www.productworx.com
Before the rear cradle was put back into the car, we opted to fit a set of rear sub frame locks. Like most manufacturers, Nissan use pressed in rubber bushes 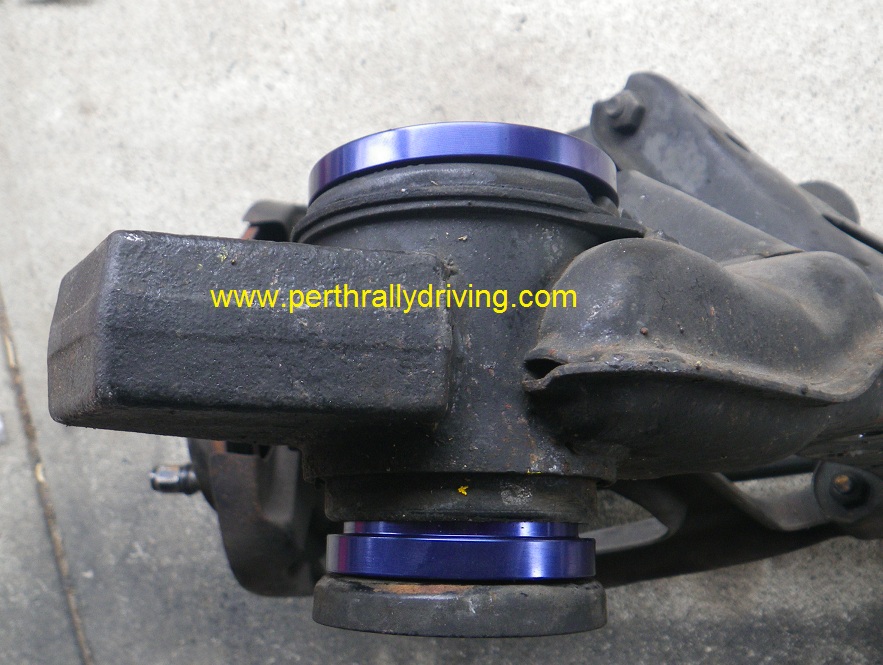 with steel inserts to mount the rear sub frame. The rubber bush acts as a damper to aid with NVH. Whilst the rubber bushes may be fine for everyday road use, in competition use, you want the suspension to perform precisely without additional uncontrolled movement. The photos of the bushes in the old cradle speak for themselves.
The machined aluminium sub frame locks come in a kit of 8 (one upper and one lower for each mounting point). They are designed to be installed without dropping the rear sub frame out, however as the frame was already on the ground, it was no drama for us. The locks are specifically shaped to match the contours of the factory bushes and pull up tight against the steel insert through the centre of the bushes. Once bolted back into the car, the rear sub frame is now effectively solid mounted. This ensures no more 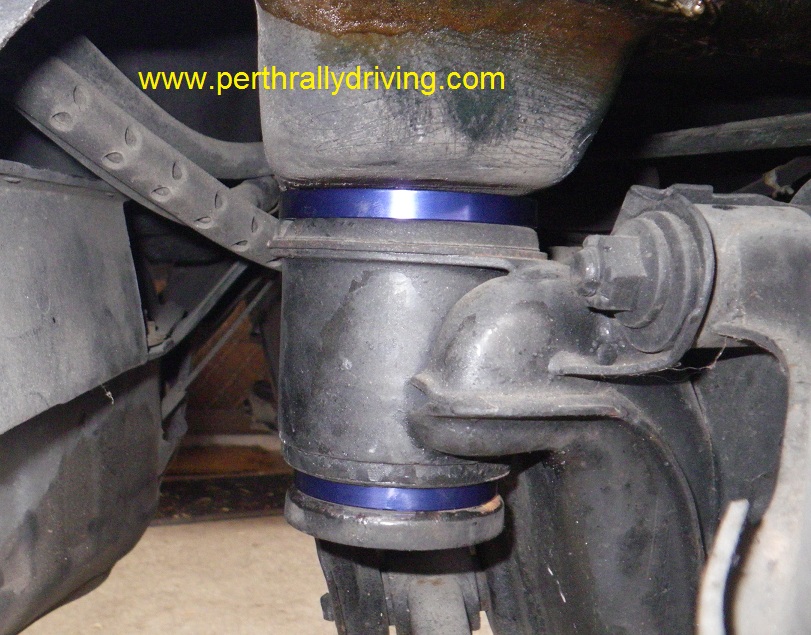 flogged out mounting bushes, better suspension geometry and increased rigidity. A cheap performance enhancement.
The last check was to inspect the one piece tail shaft. Both UJ’s were found to be fine and the tail shaft will go back in once the engine mounts are replaced and the gearbox oil is drained.
In the mean time, interior tar removal and seam welding continues whilst we wait on the roll cage to arrive.
Next post will focus on other mechanicals like engine mount replacement, fitting thermo fans and front suspension work.
We are still in need of all the standard intercooler hoses and pipe work. If anyone has these items laying around in their shed, please contact us, we’ll be happy to take them off your hands.
More build articles here
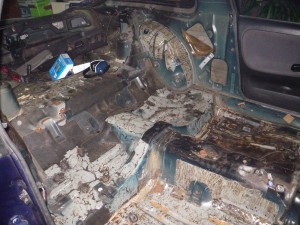
When building any dedicated competition car, preparation is the key. Even for cars used for club events like Khanacross, Autocross and tarmac events, a lot can be gained for very little cost. Weight = performance. Just by removing various un-necessary items, a huge amount of weight can be saved. Straight away even without any engine mods, the power to weight ratio is improved.
To build a competitive gravel Rally Car, a lot of preparation time is spent removing items before new parts are fitted. With the 180SX in the workshop the fun began. First on the list was a full strip of the interior. All the seats, carpets, centre console, roof lining and plastic trims all ended up out of the car. Worthwhile items such as the roof lining and front Skyline seats were carefully removed for future re-sale. Same went for the Sony car stereo and turbo timer. Any recyclable items such as steel brackets etc went into the scrap metal bin.
The factory dash, front door linings, sill kick panels and heater controls were all kept. Some of these items are required by CAMS rally rules and must be retained in the car.
We got the scales out to work out how heavy some of the items were we’d removed. For example, a quick weigh of the two 6×9 speakers that were cut into the rear hatch cover showed a little over 4kg on the scales! The bottom back seat cushion didn’t weigh much, however the stronger folding section of the rear seat was quite heavy.Whilst stripping the car, we removed the front mount intercooler (FMIC) and all of the associated pipes. Some would be asking themselves why we did that. We know for these type of cars it is a usual mod to fit a front mount. Simply put, the rally regulations do not allow it. You have to run the factory intercooler or one of a similar size and in the factory mounting location. If the car wasn’t fitted with an intercooler (ala some of the early Mitsubishi Starions and Nissan Exas), you’re not allowed to fit one for gravel rally. I’ll cover more on the list of allowed parts on another post further into the build.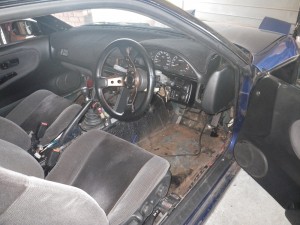 In the case of the 180SX, the giant FMIC weighed in about 15kg and that didn’t include all of the stainless pipe work, extra hoses and clamps. It shows that it doesn’t take much for the weight to add up. Between the rear speakers and the FMIC, we’d “Jenny Craig’d” 20kg of weight out of the car.
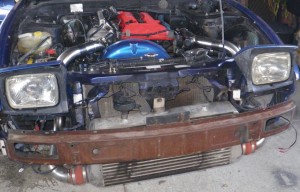
Once the trims were all out, we then set about removing a lot of bodgey wiring. The Alarm and turbo timer were not well installed and wiring to an array of gauges was an electrical fire waiting to happen too. The electrics were all tidied and repaired. We also discovered that some crucial vacuum/boost lines had more tee’s than garden reticulation. To this day I am still amazed of how some people have no idea about what ranks as critical with engine management. As we progress further into the build we’ll rectify the boost lines and sort out the list of plumbing problems.
While stripping the car, the complete rear cradle and tail shaft was dropped out of the car. On some cars it is a real sod to get the rear sub frame assembly out. Thankfully the S13 is a pretty straight forward job. Whilst dropping out the rear cradle, the hand brake assembly and cables were also removed. Brakes detail will be covered in a future post.
The next job is the most tedious and often dirty job of the whole build. Stripping the body deadening and seam welding. To give a rally car shell longevity and improve rigidity, the shell is seam welded. In a nut shell, this means stitch welding the whole shell inside and out around crucial seams. In the ideal situation, a car is completely stripped of everything, acid dipped to remove all sealant and tar and then mounted on a rotisserie. This of course comes at a cost and like many competitors, there is only so much budget and time available. With a strict budget and the start of the 2013 season not that far away, mechanical stripping was the only avenue for this build.
On the 180SX, the underside of the car is treated with a thin coat of tar paint. It was relatively easy to remove the coating around the rails and suspension 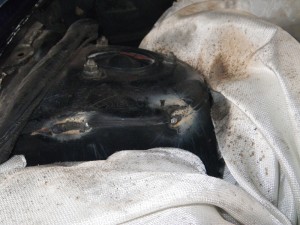 pick up points where required. The seam welding then began. After spending many hours under Rally Cars on a hoist seam welding in the past, I have come to the conclusion that axle stands and a creeper are a much easier way to perform the work.
 Inside the car the sound deadening tar removal began. Most manufacturers use tar as a cheap way to reduce NVH without adding a large amount of carpet underlay or foam. We are weighing the tar as it is stripped from the car, so far around 10kg has been removed with just under half the car to go. As the tar is removed from each section of the car, the seam welding inside continues.
We count ourselves lucky with the 180SX as far as the tar goes. On a previous Commodore rally car build, we stripped a good 60-70kg of tar from the shell! Even MKII Escorts have around 30kg stuck to the floor.
Next post we’ll be tackling the rear sub frame and mechanicals.
More build articles here
Welcome to post no.1 of our build of a Nissan 180SX (S13) gravel rally car build. To give some brief history we have been building, maintaining and competing in rally cars for a very long time. Along the way we have built many different types of gravel Rally Cars, too numerous to list. This however is our first foray into Nissan’s S13 platform. Well known in drifting circles (pardon the pun), Nissan’s S13 180SX/Silvia is a good package on paper. A turbo charged 2L, rear wheel drive coupe with a good power to weight ratio and IRS.
Personally, we still prefer 4WD Turbo Subarus for our own competition and Gravel Rally Experiences, however some love rear wheel drive. This 180SX Rally Car is being built for a customer of ours. The car will contest the WA State Rally Championship in gravel rallies for 2013 and beyond.
Initially the plan was to find an empty S13 Silvia shell and build up all of the correct bits as we wanted it. To this end, we sourced a shell and started looking for a suitable drive train and other parts. Within a few days of sourcing the Silvia shell, we came across and ad for a 180SX that have been given a work order for being un-road worthy.
 We went to have a look with the intention of possibly completing the road worthy repairs and re-licensing the car and continuing with the Silvia build. We realised not long after looking at the 180SX that it would be better suited as a base to build a rally car. We bought the car a few days later and headed back to the workshop to thoroughly examine what we’d bought. Note: We’d had a good look and test drove the car before we bought it. We have also created a Buying E-Guide to assist with purchasing used cars.
As the previous owner did not have much history on the car, some of the details were a little sketchy.
Under the bonnet is a red top SR20 engine, mated to Nissan’s reliable 5 speed and what appeared to be a locked diff in the rear end. Test driving revealed a button type clutch was fitted as well as a one piece tail shaft. Pulling back the passenger side carpet, we found plug & play Wolf 3D engine management. A Tomei sump, 3″ turbo back exhaust with venturi dump pipe and a big front mount intercooler, were amongst the other go fast bits included with the car.
Damage to both sills suggested drifting had been in the car’s history as well as some tell tale holes through the floor and carpets from a previously fitted roll cage. All in all, the shell is pretty straight and we think we have a good base to begin with.
With any used performance car you invariably find some modifications. Done properly, performance modifications can add value and reliability to a car. In the case of this 180SX, some of the mods were “animal” and needed to be removed. First up was the solid engine mounts that transmitted so much vibration that a John Deere tractor was a smoother ride (believe us we know!) Also the factory crank case ventilation had all been removed causing large oil/blow by problems. Added to the list of removals was a poorly installed alarm and a huge amount of bad wiring that powered everything from guages to previously fitted “Doof Doof”. The front mount intercooler was well engineered, however it’s fitting was dubious and some of the intercooler hoses used, no doubt caused boost leaks.
Once we had the car up in the air, we could assess what would need replacement or additional work.
The list was comprehensive, however there is always a long list when you build a full rally car.
We found all the factory rubber bushes in the rear end were cactus. The same applied for the front sway bar, lower control arms and castor rod bushes. The rack boots and tie rod ends had been replaced, however the factory rack end arms are as thick as tooth picks and needed replacement to cope with the rigours of gravel rally.
Engine mount replacement and a curious problem with the power steering lines rubbing on the sump needs solving. The waste gate actuator is wired on (agricultural) and it looks as though the waste gate may have been welded shut at some point! The car also needs to have a blow off valve fitted and the front mount intercooler removed.
The left hand inner CV boot was split and all the grease had sprayed over the rear sub-frame. We also found some small sections of rust that need treatment, thankfully there is only one small section in the right rear guard that needs a small patch welded in.
That’s it for now. We’ll update as we progress the build. -More build articles here
If you would like to go Rally Driving and don’t have the budget or time. Why not a Rally Driving Experience? You can drive 4WD Turbo Subaru rally cars sideways on the dirt and we’ll show you how: www.rallyaction.com.au
The best Rally Driving Experiences in Perth, Gravel Motorsport and State Championship Rallies in Perth and WA. On this site there are articles on Perth Rally history, Rally & Club Car build projects and free MP3 Pod casts on how to get into rally and become a rally driver.


Join our mailing list ![]()
